*****************************************************************************************************************************************************************
Coaching Stock Heating Van by Hywel Thomas
*****************************************************************************************************************************************************************
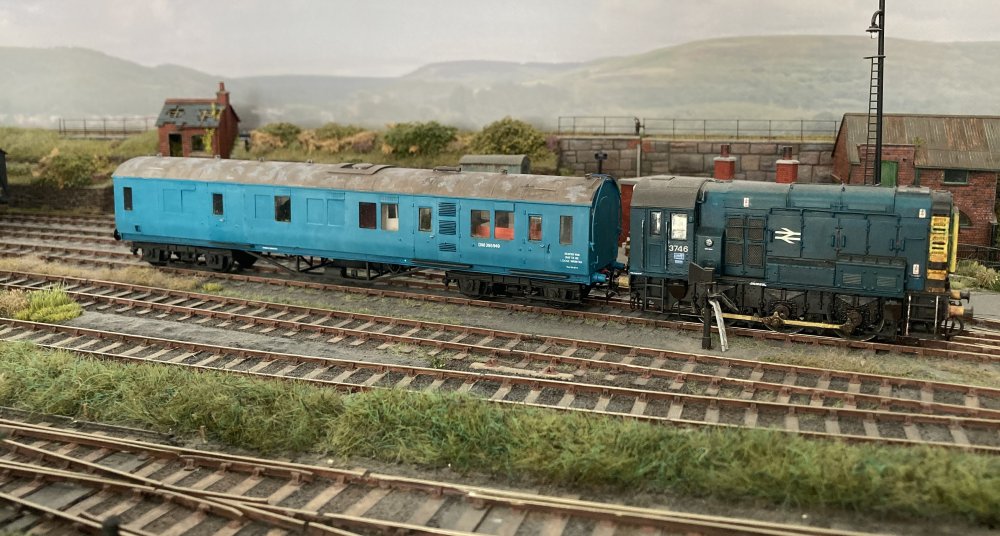
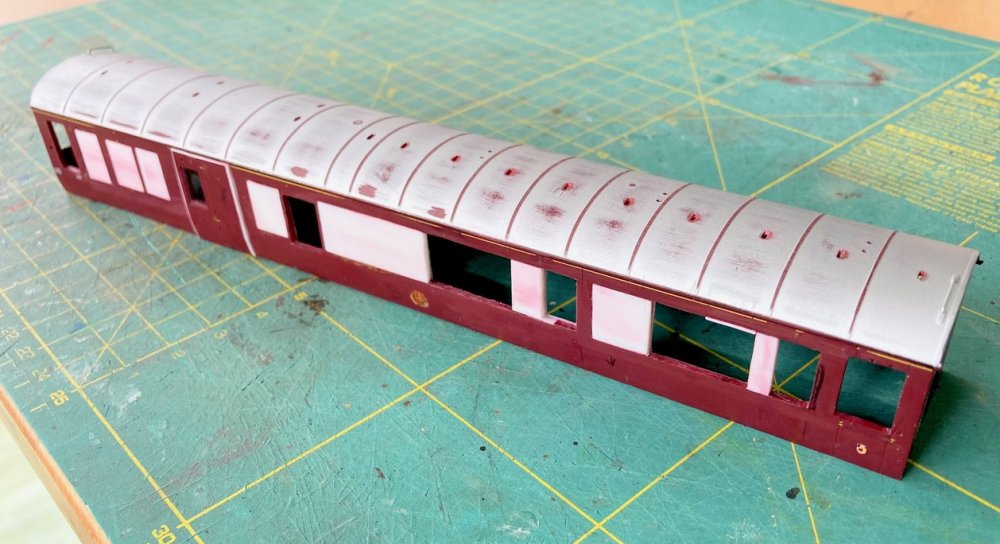
Coaching stock heating van as featured on the June 2026 update page (model_omwb240).
 Yet another project that has been waiting in the queue for rather longer than it should
have! The Heater Vans were converted from 1960 to provide steam heat for trains on the
West Coast route after electrification, as the new AC electric locos were ETH fitted only
and most coaches were then still steam heated. Within a few years, as more ETH stock became
available the fleet were relegated to carriage heating duties at coach sidings or terminus
stations across BR. The batch of 20 vans (originally planned as 29) were converted from 57ft
LMS diagram 1745 vestibule TOs and followed a prototype van converted in 1958. The production
vans, to diagram 2192, were numbered M44401 to M44420 and classified as coaching stock
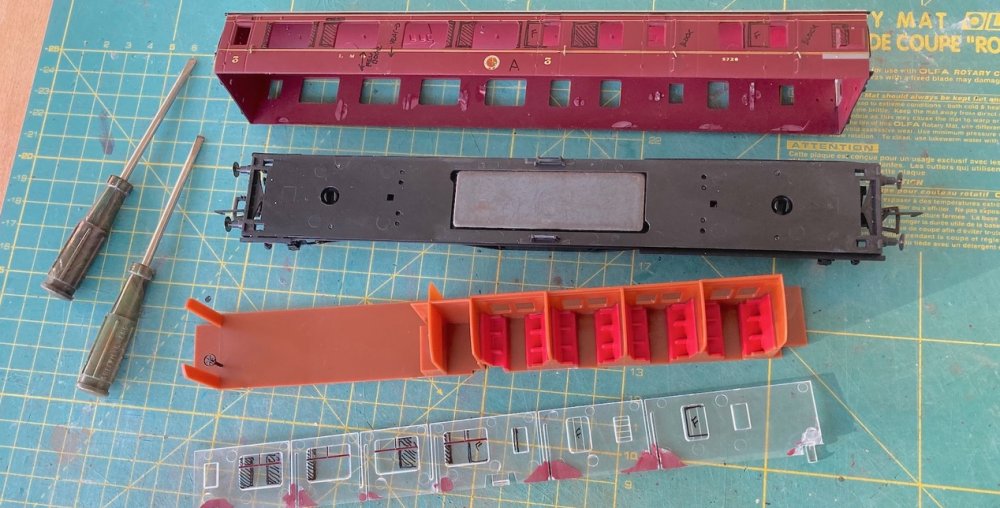
although several were later re-numbered in the LMR departmental series. The donor coach is
seen here after dismantling. This was a Hornby R4805 corridor brake third 5726 (Stanier
diagram 1905) as there were no diagram 1745 RTR stock about so I also needed a set of
Comet etched brass coach sides for the correct TO. All the detail was removed off the Hornby
donor and the Comet sides cut where required using a slitting disk in a mini-drill, to
accommodate the additional doors that were installed during the conversion.
Yet another project that has been waiting in the queue for rather longer than it should
have! The Heater Vans were converted from 1960 to provide steam heat for trains on the
West Coast route after electrification, as the new AC electric locos were ETH fitted only
and most coaches were then still steam heated. Within a few years, as more ETH stock became
available the fleet were relegated to carriage heating duties at coach sidings or terminus
stations across BR. The batch of 20 vans (originally planned as 29) were converted from 57ft
LMS diagram 1745 vestibule TOs and followed a prototype van converted in 1958. The production
vans, to diagram 2192, were numbered M44401 to M44420 and classified as coaching stock
although several were later re-numbered in the LMR departmental series. The donor coach is
seen here after dismantling. This was a Hornby R4805 corridor brake third 5726 (Stanier
diagram 1905) as there were no diagram 1745 RTR stock about so I also needed a set of
Comet etched brass coach sides for the correct TO. All the detail was removed off the Hornby
donor and the Comet sides cut where required using a slitting disk in a mini-drill, to
accommodate the additional doors that were installed during the conversion.
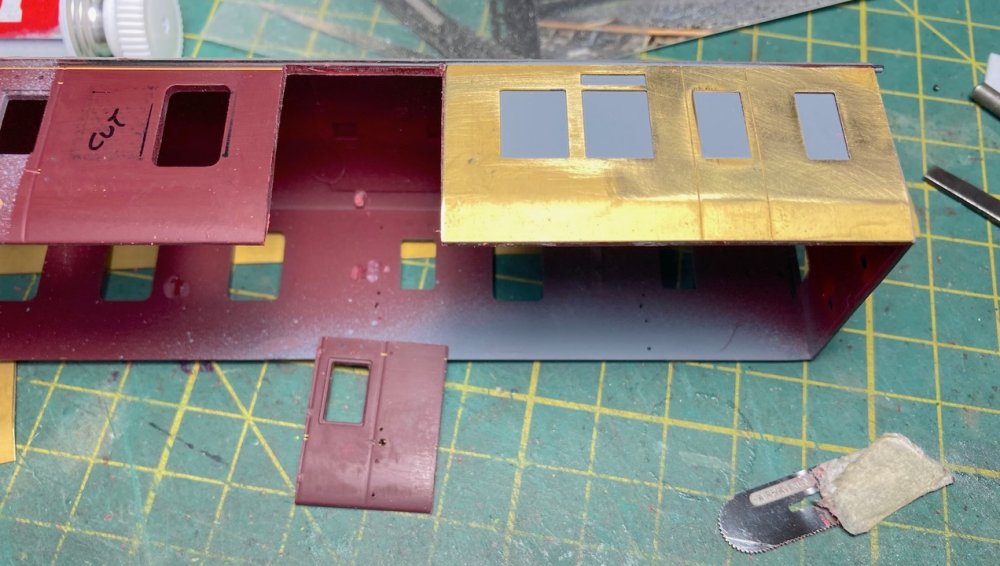
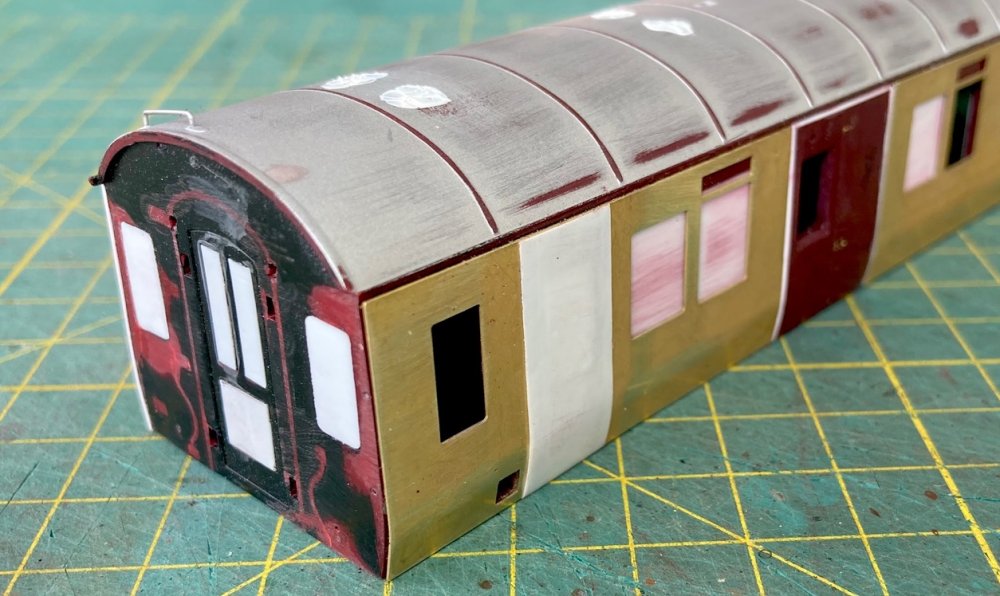
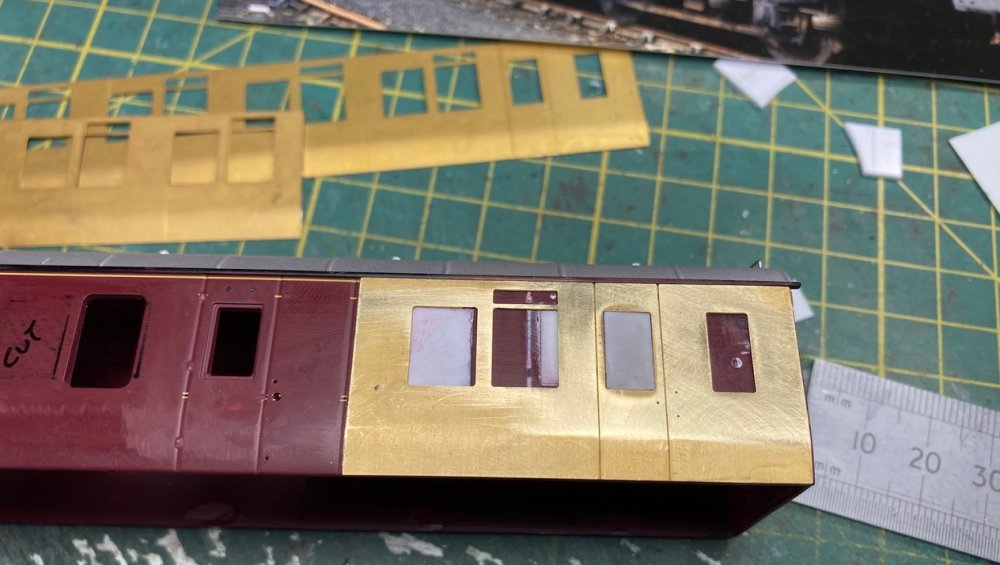 And here is the brass overlay in position with the sealed window positions. The door at this
end was not used in the prototype conversion and was plated over with a steel sheet, which
will be added later. Several of these vans ended up on the Western Region. I initially
planned to model the Canton example (in very worn maroon livery) but that van was essentially
an internal user so I settled on one of the Old Oak Common pair. I imagine it being moved
down to the carriage sidings at Swansea (which was home briefly to one of the smaller SR
vans, DS70185) via Morfa Bank, so it will be an infrequent visitor.
And here is the brass overlay in position with the sealed window positions. The door at this
end was not used in the prototype conversion and was plated over with a steel sheet, which
will be added later. Several of these vans ended up on the Western Region. I initially
planned to model the Canton example (in very worn maroon livery) but that van was essentially
an internal user so I settled on one of the Old Oak Common pair. I imagine it being moved
down to the carriage sidings at Swansea (which was home briefly to one of the smaller SR
vans, DS70185) via Morfa Bank, so it will be an infrequent visitor.
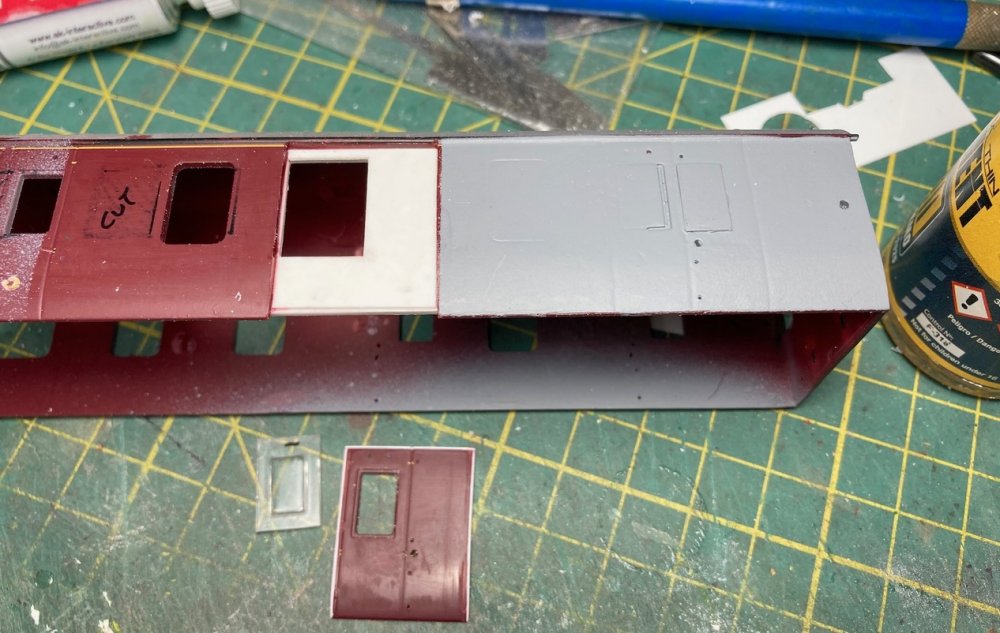
 The extra thickness of the overlay meant that the double doors needed to be cut out using a
very fine saw blade and reaffixed about half a millimetre proud of their original position.
The body side beneath the overlay was primed early to see what areas needed filling to avoid
any unsightly lines.
The extra thickness of the overlay meant that the double doors needed to be cut out using a
very fine saw blade and reaffixed about half a millimetre proud of their original position.
The body side beneath the overlay was primed early to see what areas needed filling to avoid
any unsightly lines.
 With that overlay removed the position of the old windows is clear but the visible lines
did not require filling as they will soon be permanently hidden behind the Comet side. A
piece of 30-thou sheet has filled in the door aperture (the large gap will accommodate the
original window moulding) and a 20-thou inlay added to bring the door moulding out to the
level of the brass sides. Pieces of thin strip have been added around the doors to
the thickness of the saw cuts.
With that overlay removed the position of the old windows is clear but the visible lines
did not require filling as they will soon be permanently hidden behind the Comet side. A
piece of 30-thou sheet has filled in the door aperture (the large gap will accommodate the
original window moulding) and a 20-thou inlay added to bring the door moulding out to the
level of the brass sides. Pieces of thin strip have been added around the doors to
the thickness of the saw cuts.
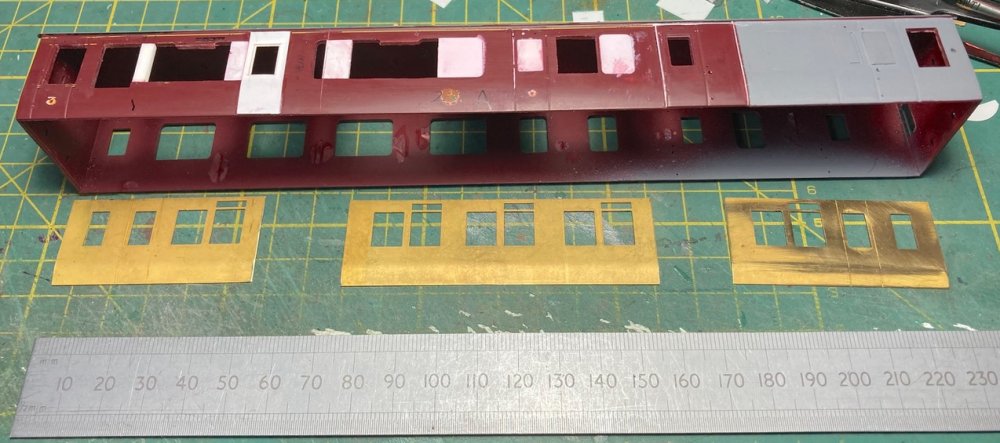 Here is the full side with much butchery evident to get the new window openings clear and
the door refitted proud of the original side. The three parts of the Comet side illustrate
the way these windows will fit onto the heavily modified donor. Some will be plated as part
of the original van conversion, some open.
Here is the full side with much butchery evident to get the new window openings clear and
the door refitted proud of the original side. The three parts of the Comet side illustrate
the way these windows will fit onto the heavily modified donor. Some will be plated as part
of the original van conversion, some open.
 The next area to be tackled was the vented door, behind which on the prototype is the
generator. The new doors were built up with layers of 10-thou sheet (being careful to get
the levels correct with the adjoining brass sides) while the louvres were created by using
Evergreen strip with thinner strips used between each one to create consistent gaps- see below.
The next area to be tackled was the vented door, behind which on the prototype is the
generator. The new doors were built up with layers of 10-thou sheet (being careful to get
the levels correct with the adjoining brass sides) while the louvres were created by using
Evergreen strip with thinner strips used between each one to create consistent gaps- see below.
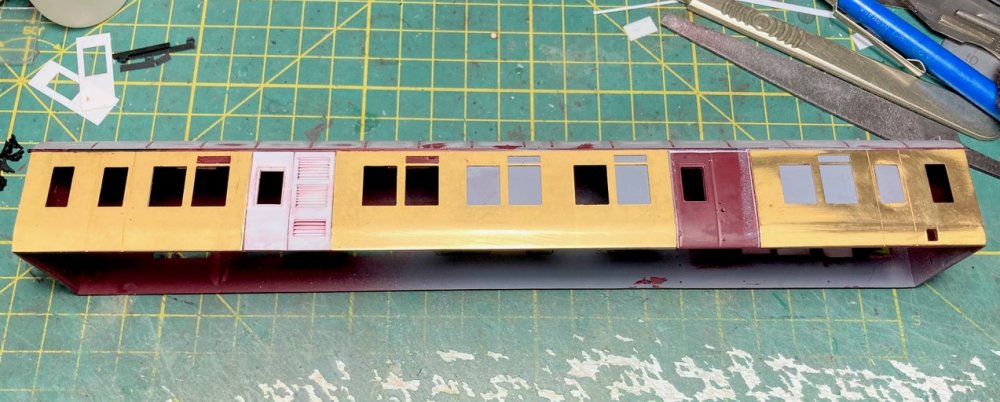 This is the first side basically complete but with lots still to do. The square cut out at
the right hand end will accommodate the water tank fillers (there are two tanks, one each
side behind the blanked off windows).
This is the first side basically complete but with lots still to do. The square cut out at
the right hand end will accommodate the water tank fillers (there are two tanks, one each
side behind the blanked off windows).
 The first side was a learning curve so when tackling side two I made a few changes to the
way the body was initially modified. This side ended up rather stronger than the original
and didn�t require so much bracing behind the scenes. By now the roof has had all the
vents and pipework removed as there are some big modifications to come up there. The
prominent bands have also been thinned down ahead of the later work.
The first side was a learning curve so when tackling side two I made a few changes to the
way the body was initially modified. This side ended up rather stronger than the original
and didn�t require so much bracing behind the scenes. By now the roof has had all the
vents and pipework removed as there are some big modifications to come up there. The
prominent bands have also been thinned down ahead of the later work.
 Next to be tackled were the ends. These were going to require 10-thou overlays so all the
detail (and the corridor connections) was removed. The recesses on the doors were also filled
in and, on this end, the windows of the original guard�s compartment. The handrail on the
roof was left in place from the original coach. Also added now is the plate over the
redundant door at this end. The holes where the vents were removed have also been filled.
Next to be tackled were the ends. These were going to require 10-thou overlays so all the
detail (and the corridor connections) was removed. The recesses on the doors were also filled
in and, on this end, the windows of the original guard�s compartment. The handrail on the
roof was left in place from the original coach. Also added now is the plate over the
redundant door at this end. The holes where the vents were removed have also been filled.
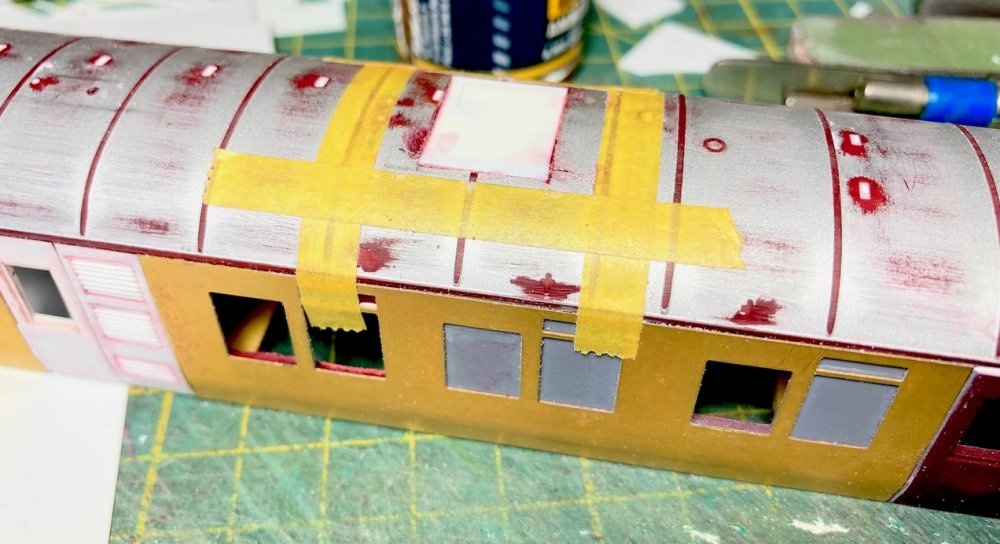 Next up was the roof. The large vent for the train heating boiler was fitted into a recessed
panel in the roof and was also slightly offset to one side. The required section has been cut
out and a new flat piece fitted into the recess. The surrounding hood has been marked out
using masking tape before measuring and cut from 30-thou sheet.
Next up was the roof. The large vent for the train heating boiler was fitted into a recessed
panel in the roof and was also slightly offset to one side. The required section has been cut
out and a new flat piece fitted into the recess. The surrounding hood has been marked out
using masking tape before measuring and cut from 30-thou sheet.
 It�s getting there! The large boiler vent, the hood and the exhaust pipe above the generator
have been fitted. Also added by this stage are the central roof shell vents, the water filler
pipes at one end and the lamp irons. New vents over some of the windows have also been fitted
along with door handles (again from Comet), handrails (salvaged Hornby mouldings from the
donor coach), door bumpers and hinges.
It�s getting there! The large boiler vent, the hood and the exhaust pipe above the generator
have been fitted. Also added by this stage are the central roof shell vents, the water filler
pipes at one end and the lamp irons. New vents over some of the windows have also been fitted
along with door handles (again from Comet), handrails (salvaged Hornby mouldings from the
donor coach), door bumpers and hinges.
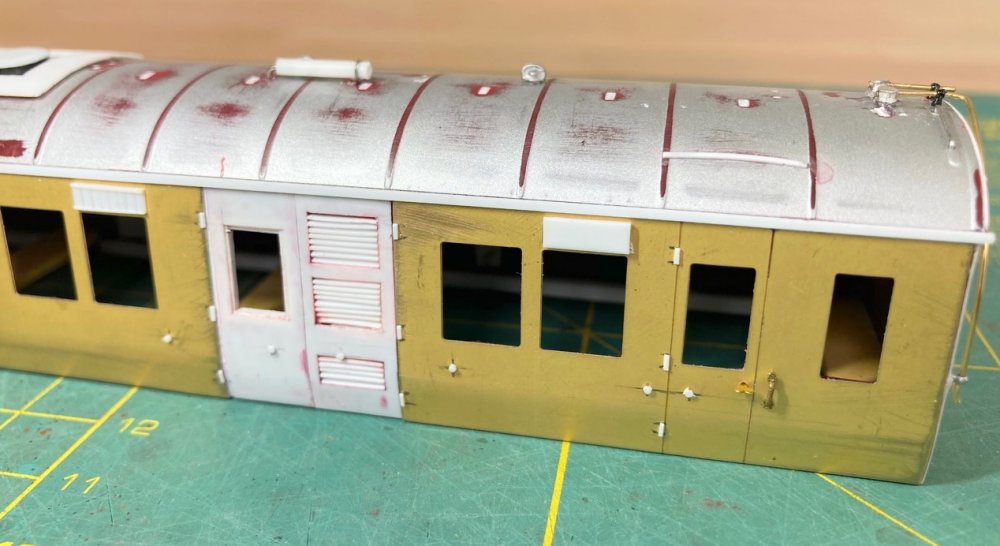 This view shows the fuel tank and generator end of the coach. The generator sits behind the
double doors (hence the vents) and exhausts through the roof where you can just pick out the
silencer on the roof. Also showing are the additional details added to the Comet sides
This view shows the fuel tank and generator end of the coach. The generator sits behind the
double doors (hence the vents) and exhausts through the roof where you can just pick out the
silencer on the roof. Also showing are the additional details added to the Comet sides
 At last primer has been sprayed and the thing is starting to look like the prototype. This
was the second attempt at this - my old faithful can of Halfords primer finally ran out
and the replacement brand was a disaster necessitating a complete strip down back to bare
metal and plastic! Halfords have changed the recipe on their primer and so, after a careful
search, a Hycote can was obtained and off we went again. Success, but there is still, however,
lots to do! The livery will be slightly faded rail blue, which was carried by all except the
maroon Canton van, DM395950 (ex-M44420M).
At last primer has been sprayed and the thing is starting to look like the prototype. This
was the second attempt at this - my old faithful can of Halfords primer finally ran out
and the replacement brand was a disaster necessitating a complete strip down back to bare
metal and plastic! Halfords have changed the recipe on their primer and so, after a careful
search, a Hycote can was obtained and off we went again. Success, but there is still, however,
lots to do! The livery will be slightly faded rail blue, which was carried by all except the
maroon Canton van, DM395950 (ex-M44420M).
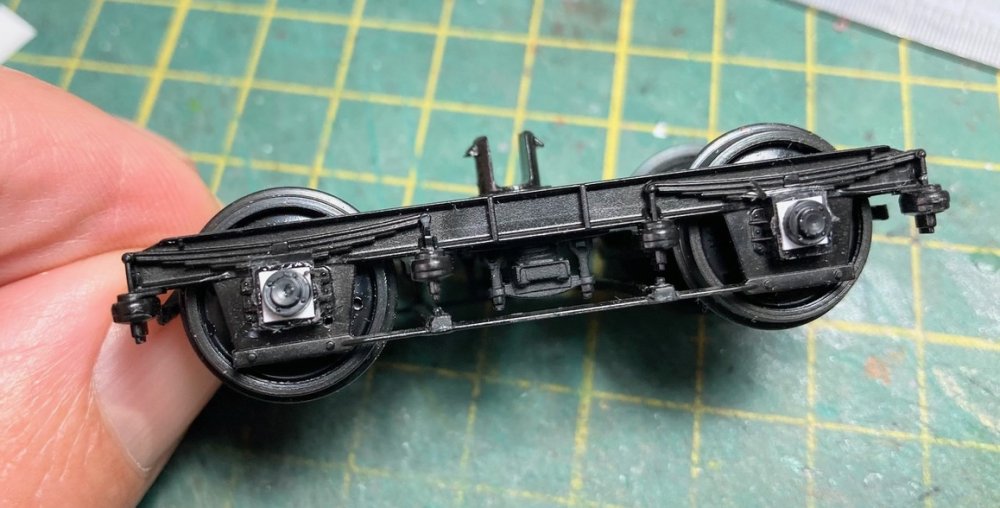 One of the unique features of these vans were the bogies - these otherwise standard LMS
examples were modified with roller bearings. For the model the original oil axleboxes
were removed with a cutting disk and then replaced with spare roller bearings from a Parkside
Grampus kit. Not perfect but close enough. Step boards will also need to be added on one set.
One of the unique features of these vans were the bogies - these otherwise standard LMS
examples were modified with roller bearings. For the model the original oil axleboxes
were removed with a cutting disk and then replaced with spare roller bearings from a Parkside
Grampus kit. Not perfect but close enough. Step boards will also need to be added on one set.
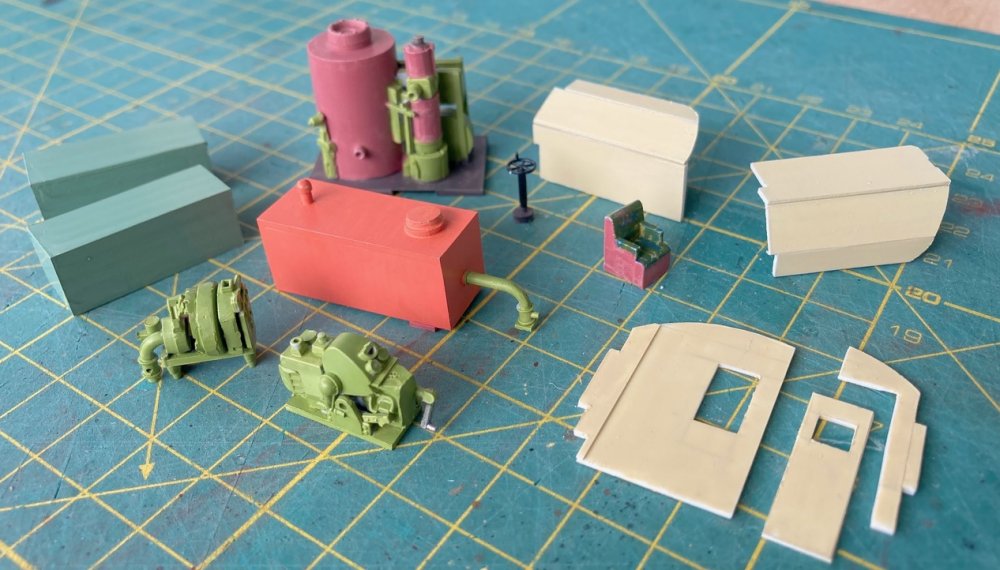 Meanwhile, in between all the bodywork, the interior details needed to be constructed.
From left to right we have the two water tanks (mainly hidden behind body panels), the
water pump, the fuel tank (not very visible in the few pictures but apparently orange!).
Behind that is the boiler itself, which looking on the diagram could have been Clayton
examples, and was made from an old cotton reel and bits from the scrap box. In front is
the generator (mainly parts from a WW2 German motorcycle and sidecar kit!). The brake
hand wheel is from the original RTR coach as was the chair. The other parts are the
lavatory compartment, the cupboard and the single internal partition.
Meanwhile, in between all the bodywork, the interior details needed to be constructed.
From left to right we have the two water tanks (mainly hidden behind body panels), the
water pump, the fuel tank (not very visible in the few pictures but apparently orange!).
Behind that is the boiler itself, which looking on the diagram could have been Clayton
examples, and was made from an old cotton reel and bits from the scrap box. In front is
the generator (mainly parts from a WW2 German motorcycle and sidecar kit!). The brake
hand wheel is from the original RTR coach as was the chair. The other parts are the
lavatory compartment, the cupboard and the single internal partition.
 The component parts ready for final assembly (and some of the prototype photos too). The
van was given several thinned brush coats of Railmatch Faded Rail Blue enamel and the
roof a mix of three different shades of grey acrylic. After adding the few transfers,
the rail blue was then further faded using a white Ammo of Mig Oilbrusher, blended with
thinners, while the roof was then given several coats of enamel washes and a coat of
matt varnish followed by a suitably patchy finish using light grey and silver weathering
pencils. In front the underframe shows the temporary positioning of the various internal
components. All of these sit on cross beams that brace the body internally so will be fitted
permanently once the windows have been fitted (to provide some room inside to slot them in).
The component parts ready for final assembly (and some of the prototype photos too). The
van was given several thinned brush coats of Railmatch Faded Rail Blue enamel and the
roof a mix of three different shades of grey acrylic. After adding the few transfers,
the rail blue was then further faded using a white Ammo of Mig Oilbrusher, blended with
thinners, while the roof was then given several coats of enamel washes and a coat of
matt varnish followed by a suitably patchy finish using light grey and silver weathering
pencils. In front the underframe shows the temporary positioning of the various internal
components. All of these sit on cross beams that brace the body internally so will be fitted
permanently once the windows have been fitted (to provide some room inside to slot them in).
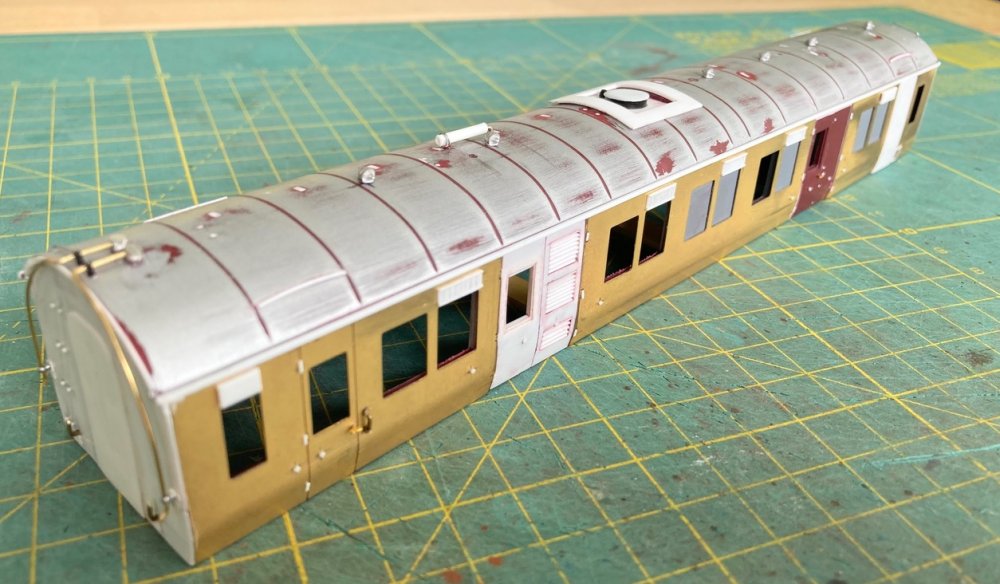
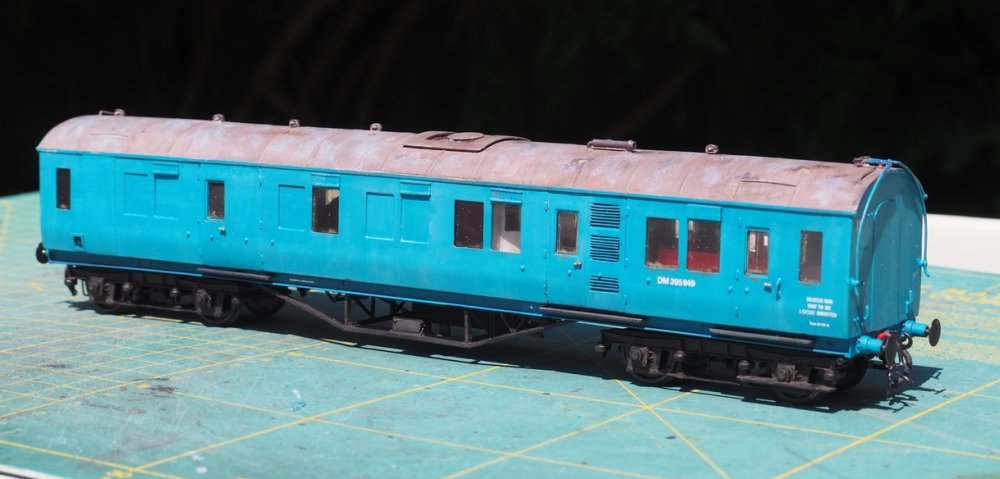 And, at last, here is the finished heater van, basking in the sun and awaiting a trip from
Old Oak Common to Swansea Maliphant via Morfa Bank. The faded rail blue has come out quite
well and matches up with the various photos of the prototype van. The original Hornby coach
was clipped together but once the interior and glazing had been removed the clips became
redundant. It is now held together with two screws from beneath, much easier than the
fiddly clips that most modern coaches use in the assembly process. And so, onto the next project!
And, at last, here is the finished heater van, basking in the sun and awaiting a trip from
Old Oak Common to Swansea Maliphant via Morfa Bank. The faded rail blue has come out quite
well and matches up with the various photos of the prototype van. The original Hornby coach
was clipped together but once the interior and glazing had been removed the clips became
redundant. It is now held together with two screws from beneath, much easier than the
fiddly clips that most modern coaches use in the assembly process. And so, onto the next project!