*********************************************************************************************************************************************
MARCH 2026 UPDATE
*********************************************************************************************************************************************
KIER HARDY
*********************************************************************************************************************************************
MIKE WHITCHURCH
*********************************************************************************************************************************************
PAUL JAMES
*********************************************************************************************************************************************
ANDY LEE
*********************************************************************************************************************************************
KARL CROWTHER
*********************************************************************************************************************************************
GREG BROOKES
*********************************************************************************************************************************************
STEVE HARROD
*********************************************************************************************************************************************
TIM SHACKLETON
*********************************************************************************************************************************************
STU DAVIES
*********************************************************************************************************************************************
Notice for expoEM Spring - 9th & 10th of May 2026.
Urgent notice of change of venue.
Due to unforeseen circumstances, it has been necessary this year to relocate the
Garth Hill College, Bull Lane, Bracknell, RG42 2AD.
The dates, opening times and admission will be unchanged.
*********************************************************************************************************************************************
![]()
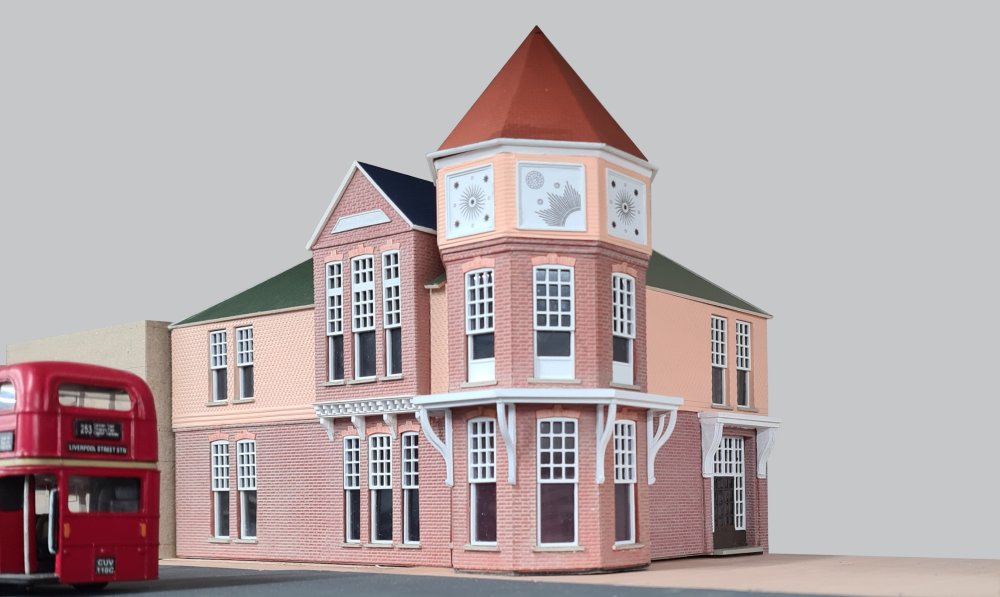 The Tate Institute was designed in a Domestic Revival style and opened in 1887 for the
workers of the Tate sugar refinery in Silvertown, East London, and included a 800-seat
hall, various meeting rooms, bathrooms, a reading room and a billiard hall. This view
shows the progress so far on the model, with more detail work yet to be carried out.
The Tate Institute was designed in a Domestic Revival style and opened in 1887 for the
workers of the Tate sugar refinery in Silvertown, East London, and included a 800-seat
hall, various meeting rooms, bathrooms, a reading room and a billiard hall. This view
shows the progress so far on the model, with more detail work yet to be carried out.
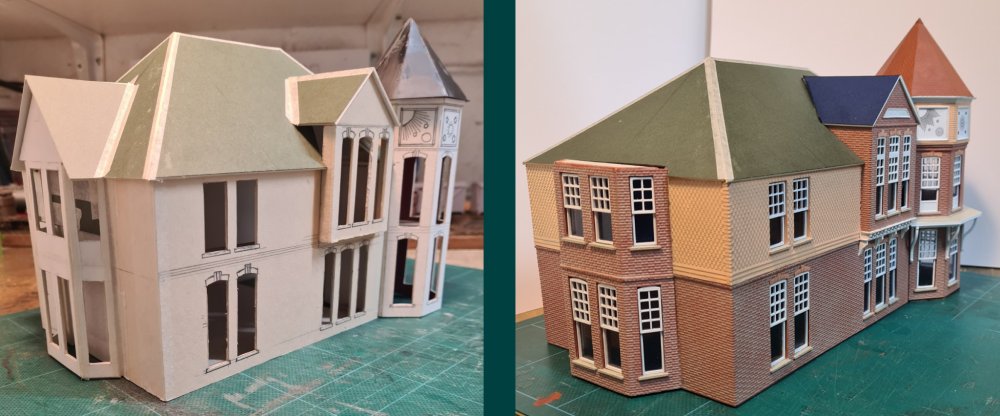 With around 16ft of buildings to construct on the new East London layout, the front part of
the institute is a prominent building and one that will give some sense of location to the
project. It is constructed from 2mm mounting card, clad with South Eastern embossed
styrene sheet, with the addition of 3D printed parts to include windows, corbels and
upper tiled facias produced by Jonny Duffett from my drawings scaled from photographs.
With around 16ft of buildings to construct on the new East London layout, the front part of
the institute is a prominent building and one that will give some sense of location to the
project. It is constructed from 2mm mounting card, clad with South Eastern embossed
styrene sheet, with the addition of 3D printed parts to include windows, corbels and
upper tiled facias produced by Jonny Duffett from my drawings scaled from photographs.
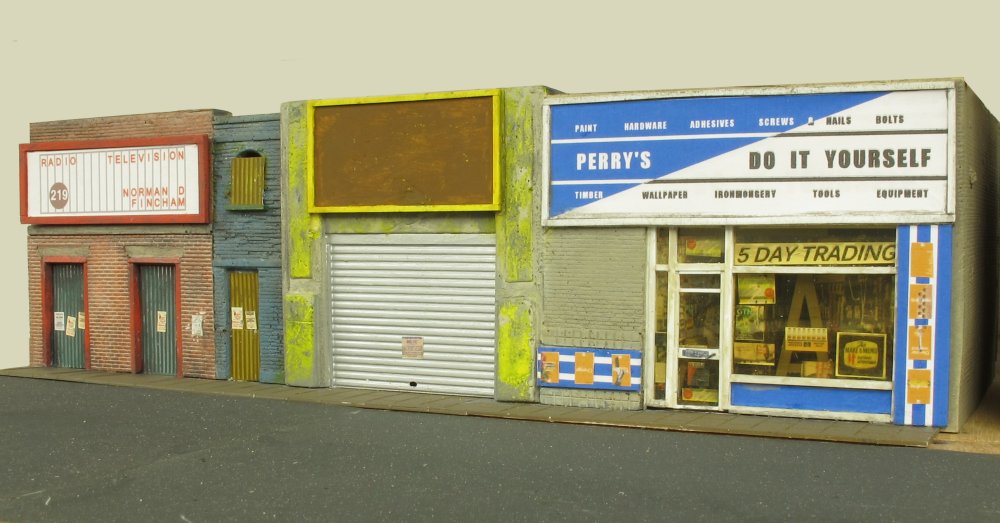 Another bit of architectural modelling has taken place on the layout. This row of commercial
buildings has been created from a set of basic resin cast parts kindly donated by Andy Lee.
The slab sections have been bonded together and detail added in the form of printed facias
and an assortment of DIY parts behind a glazed window.
Another bit of architectural modelling has taken place on the layout. This row of commercial
buildings has been created from a set of basic resin cast parts kindly donated by Andy Lee.
The slab sections have been bonded together and detail added in the form of printed facias
and an assortment of DIY parts behind a glazed window.
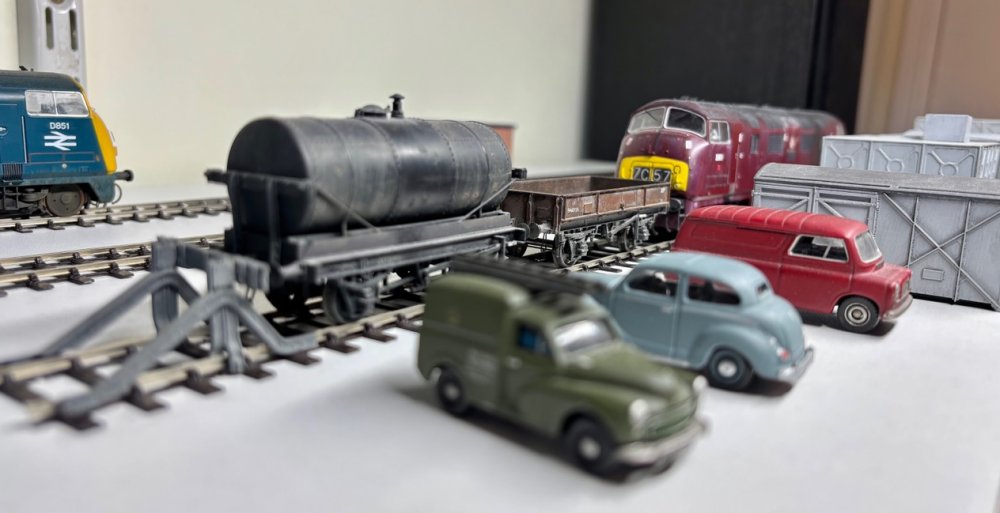
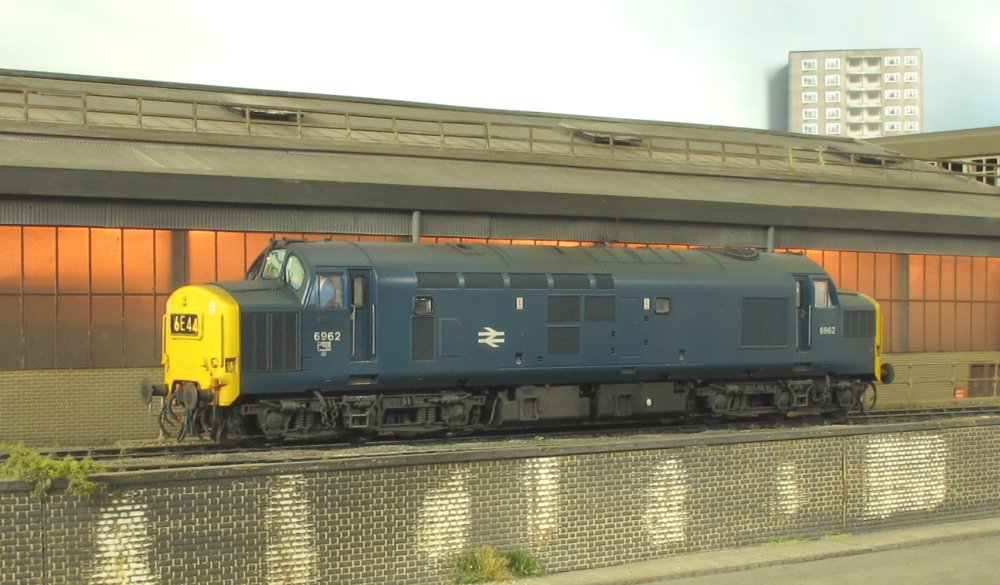 A recent addition to the Hornsey Road fleet is this English Electric type 3 number 6962 - a
Stratford allocated steam heat dual brake locomotive, and when not in use on passenger trains
from Liverpool Street, is ideal for working the Ripple Lane tank trains or the car trains from
Dagenham (Bachmann model).
A recent addition to the Hornsey Road fleet is this English Electric type 3 number 6962 - a
Stratford allocated steam heat dual brake locomotive, and when not in use on passenger trains
from Liverpool Street, is ideal for working the Ripple Lane tank trains or the car trains from
Dagenham (Bachmann model).
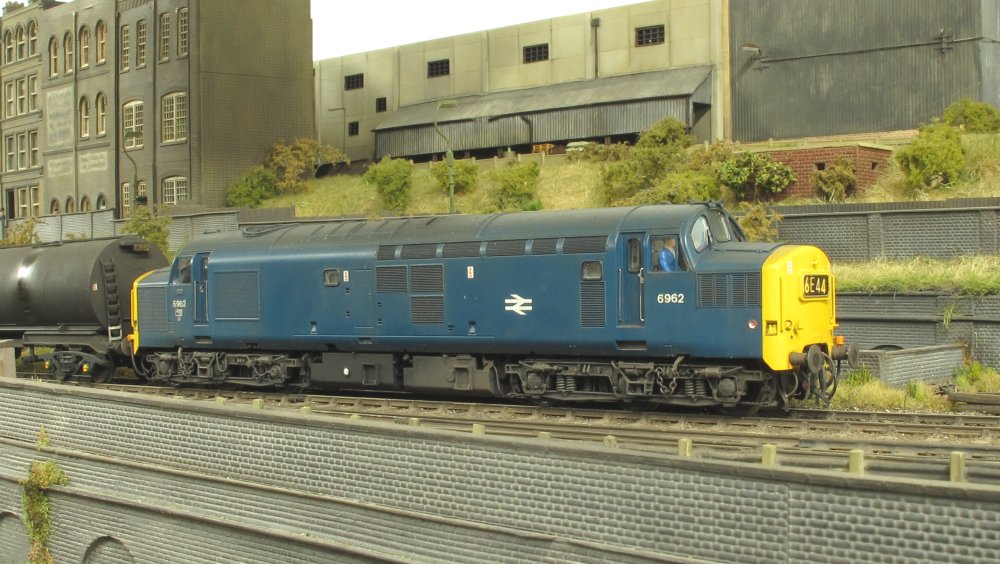 Apart from a conversion to EM gauge using the existing wheels, the only other work was to
feature the boiler port / safety valves, change the headcodes, renumber, fit a crew and
finish off with some light weathering.
Apart from a conversion to EM gauge using the existing wheels, the only other work was to
feature the boiler port / safety valves, change the headcodes, renumber, fit a crew and
finish off with some light weathering.
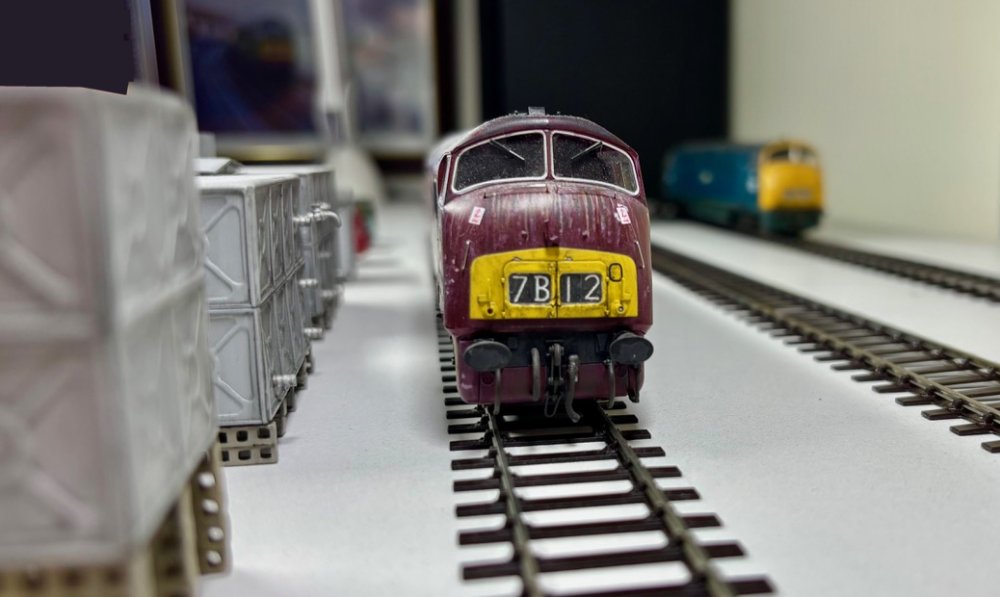
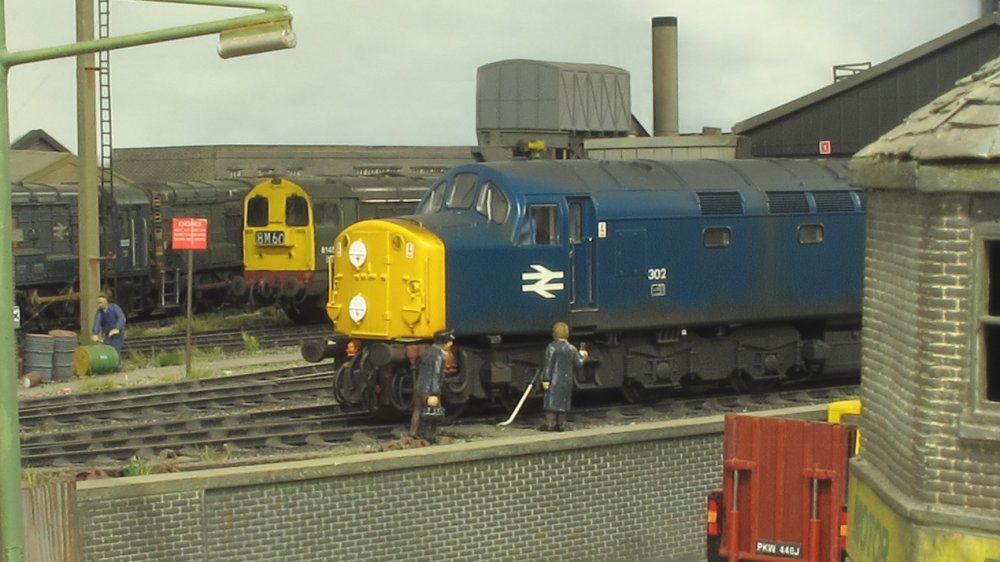 A glimpse of English Electric type 4 number 302 on Hornsey Road depot.
![]()
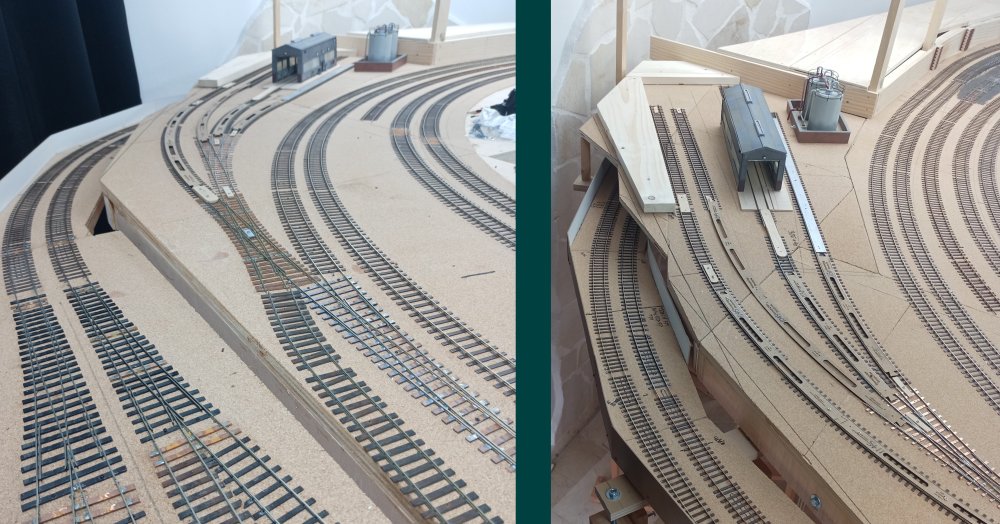 Work continues filling in gaps and corners on the layout. This month's efforts have gone
towards recreating a flavour of Shrewsbury Road Yard at the south end of Sheffield Midland
station. This will give a fuelling point and Motorail loading dock for further operational interest.
Work continues filling in gaps and corners on the layout. This month's efforts have gone
towards recreating a flavour of Shrewsbury Road Yard at the south end of Sheffield Midland
station. This will give a fuelling point and Motorail loading dock for further operational interest.
 These awkward shaped infill pieces have been made from odd bits of timber in true Yorkshireman
fashion, and cork sheets as an underlay are unheard of over here in Spain, so the 'never throw
anything away' bag was raided. In the fashion of a swan, it all looks passable on the bits you can see.
These awkward shaped infill pieces have been made from odd bits of timber in true Yorkshireman
fashion, and cork sheets as an underlay are unheard of over here in Spain, so the 'never throw
anything away' bag was raided. In the fashion of a swan, it all looks passable on the bits you can see.
 In order to give operational flexibility, a crossover is to be installed between platforms
3 and 4 to allow yard access and egress to both up and down trains.
In order to give operational flexibility, a crossover is to be installed between platforms
3 and 4 to allow yard access and egress to both up and down trains.
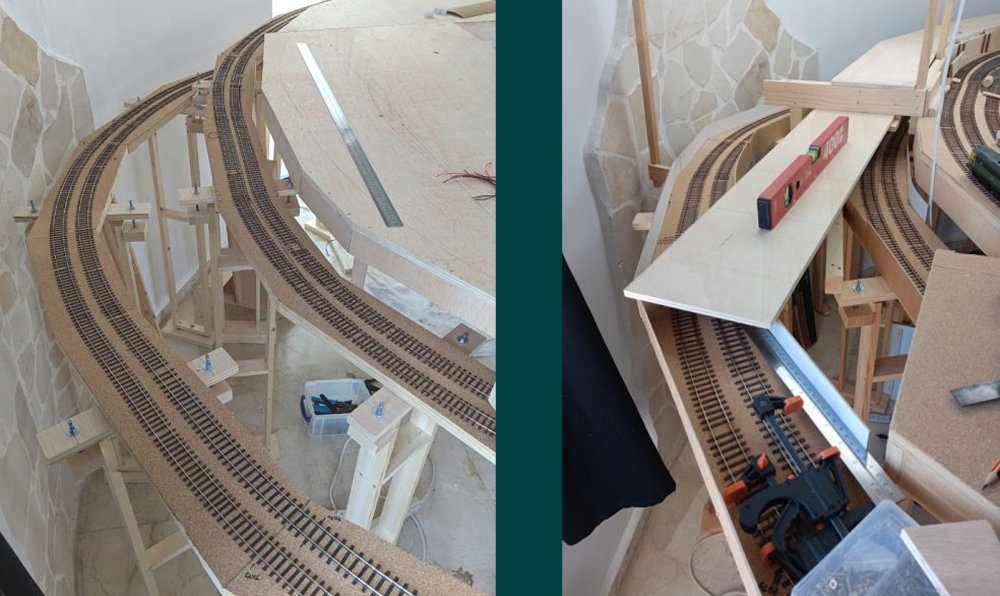 A 'before & after' shot prior to all the backscene additions. Considering these tracks were only
going to be shielded by a retaining wall, a certain person came along with his new high level
station and yard, and with me being easily led, quite a bit of expansion has taken place!
A 'before & after' shot prior to all the backscene additions. Considering these tracks were only
going to be shielded by a retaining wall, a certain person came along with his new high level
station and yard, and with me being easily led, quite a bit of expansion has taken place!
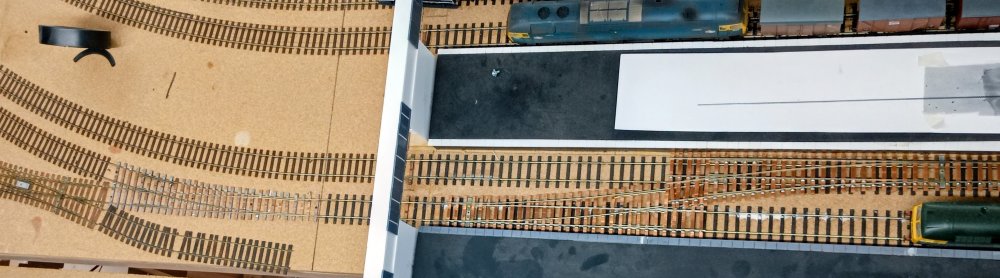
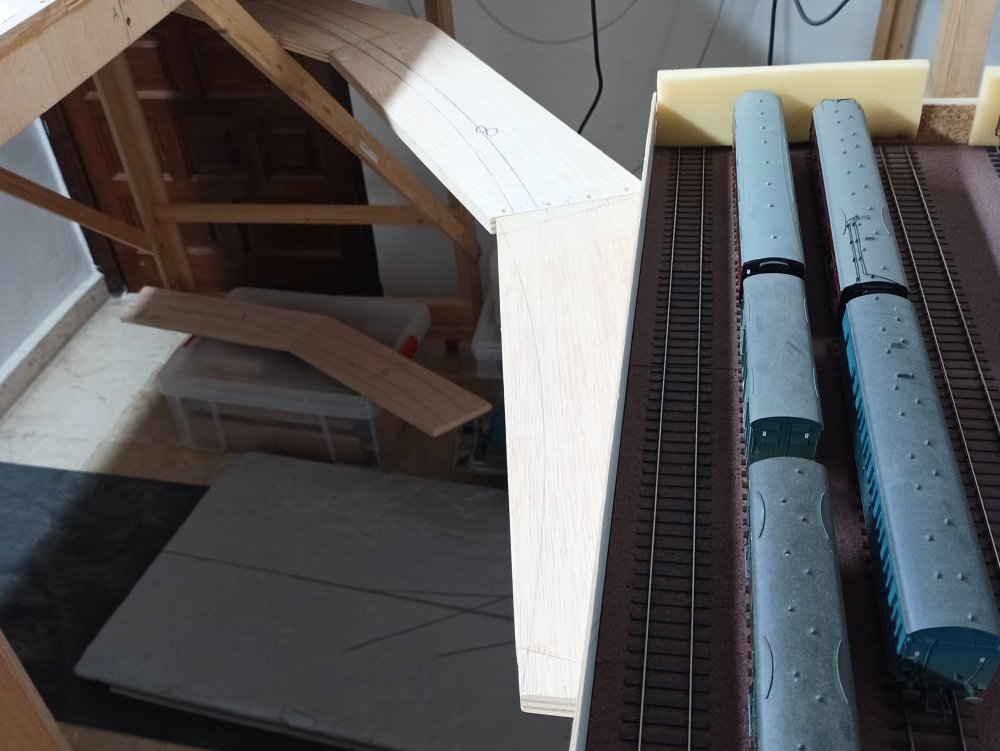 Those of you still paying attention may remember a mention in a past update, of bedrooms being
available for extra storage space.... Well a feasibility study has commenced and a bit of timber
has already been cut to give an idea of the practicalities of this. There may be a track coming off
the existing central storage yard via a 'Y' junction into a 10 road yard.
Those of you still paying attention may remember a mention in a past update, of bedrooms being
available for extra storage space.... Well a feasibility study has commenced and a bit of timber
has already been cut to give an idea of the practicalities of this. There may be a track coming off
the existing central storage yard via a 'Y' junction into a 10 road yard.
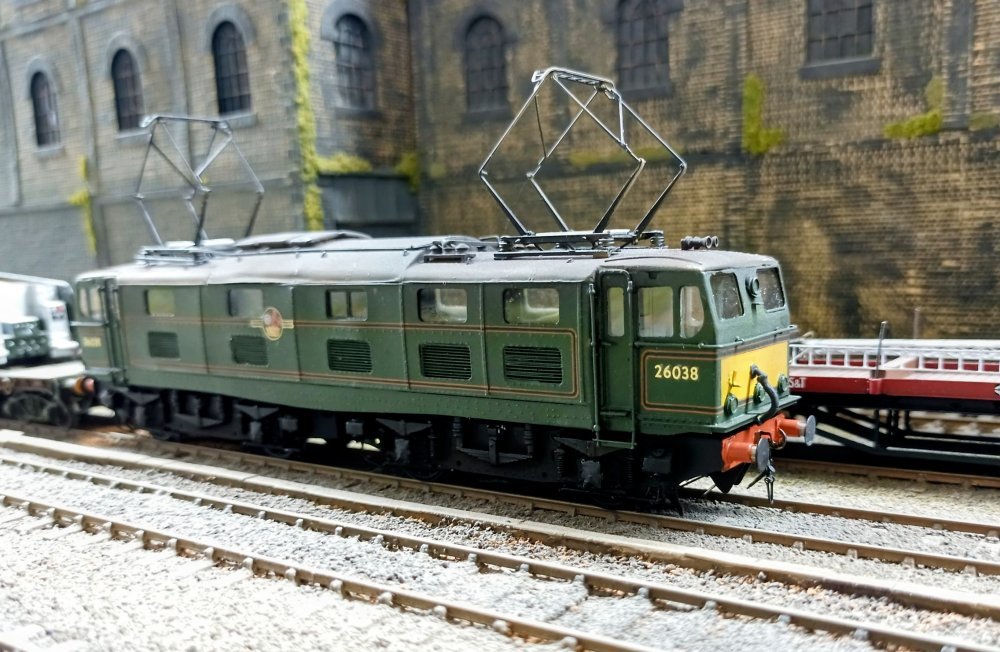 The latest addition to my fleet is this Judith Edge kit built EM1 26038, constructed
by Mike Edge, painted and weathered by Geoff Haynes.
The latest addition to my fleet is this Judith Edge kit built EM1 26038, constructed
by Mike Edge, painted and weathered by Geoff Haynes.
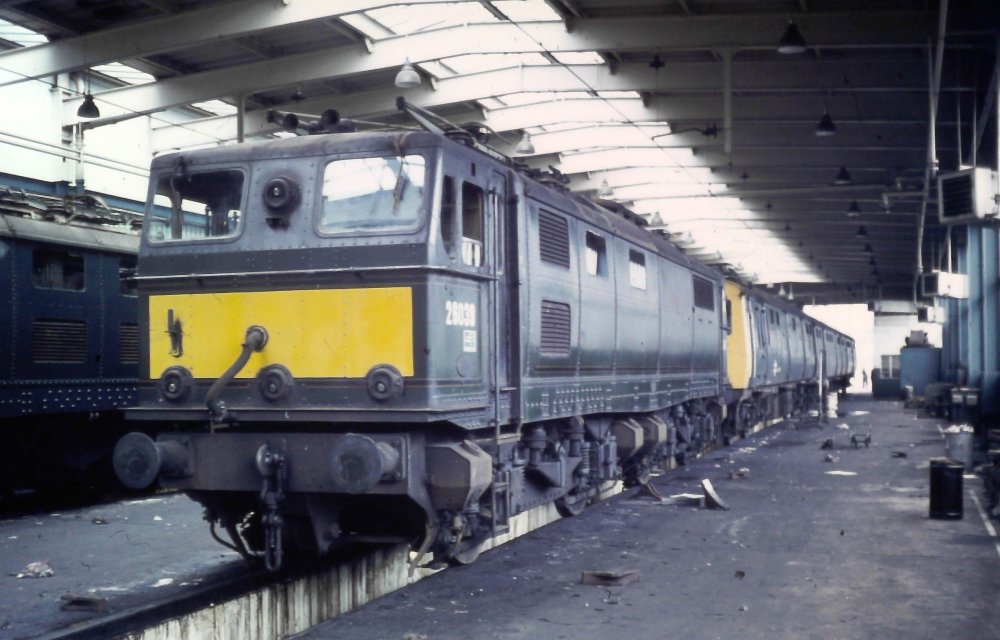 EM1 26038 in green livery with small yellow panels at Reddish depot in 1970.
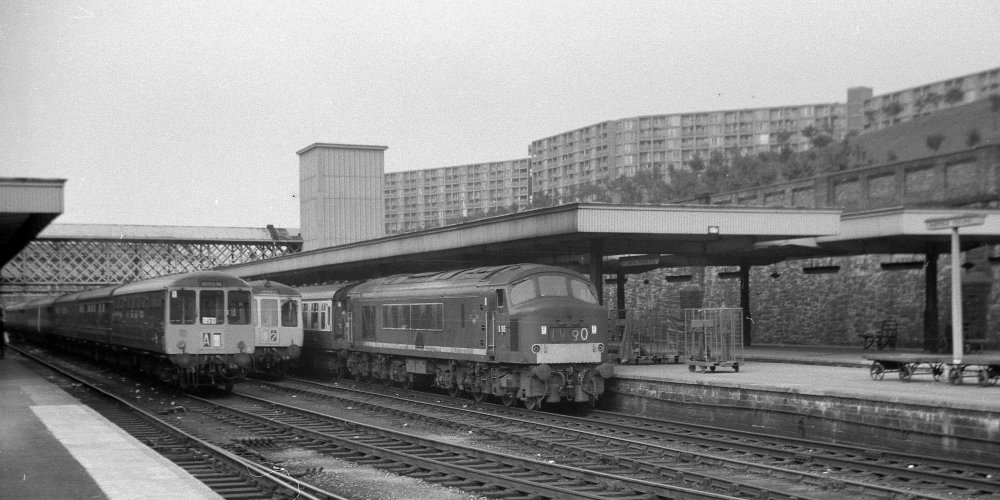 Here's some more of my early 1970s snaps to share with you all, starting off with D165 on the
1V90 at Sheffield Midland during the summer of 1970.
Here's some more of my early 1970s snaps to share with you all, starting off with D165 on the
1V90 at Sheffield Midland during the summer of 1970.
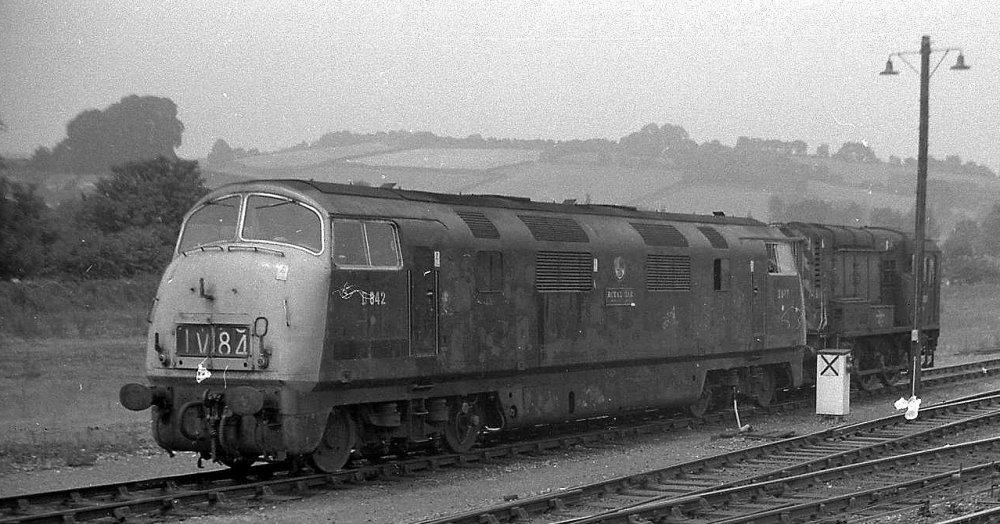 A maroon liveried D842 Royal Oak at Exeter stabling point on the 7th of June 1970.
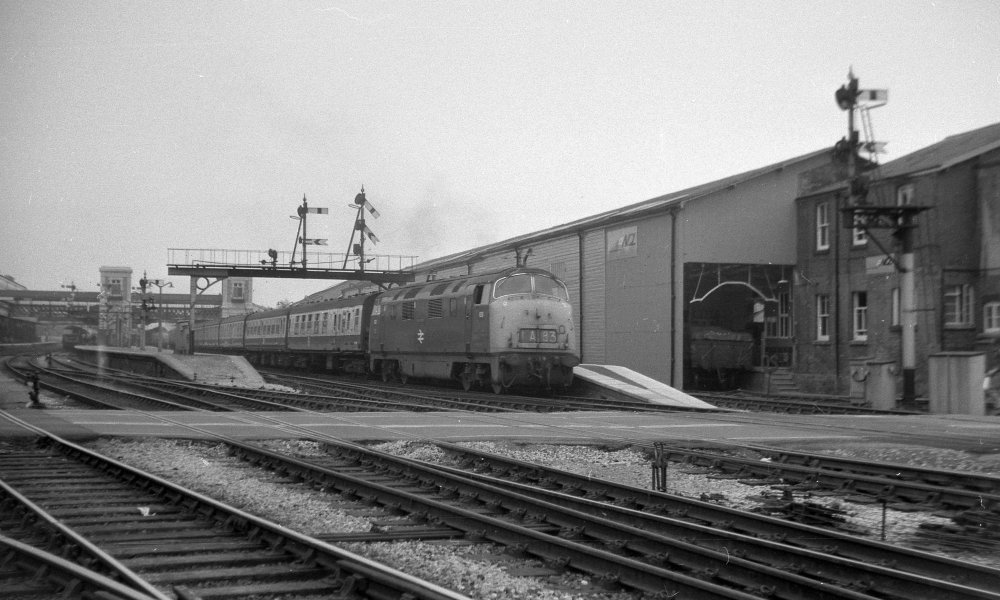 D828 Magnificent on the 1A53 Exeter St Davids on the 10th of June 1970, with D7040 & D804
Avenger in the distance.
D828 Magnificent on the 1A53 Exeter St Davids on the 10th of June 1970, with D7040 & D804
Avenger in the distance.
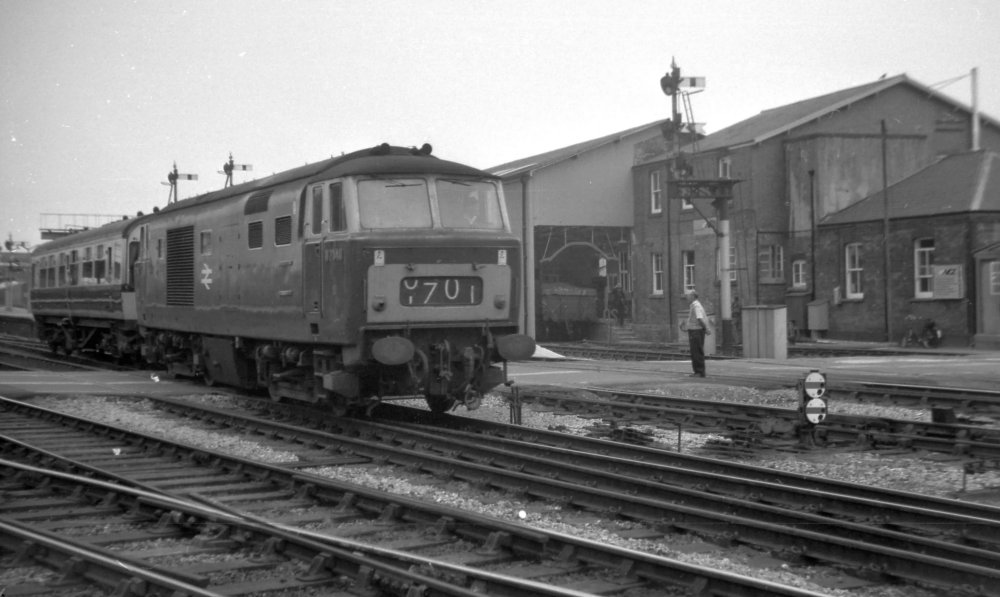 D7040 with the District Engineer's saloon at Exeter St Davids (1Z01) on the 10th of June 1970.
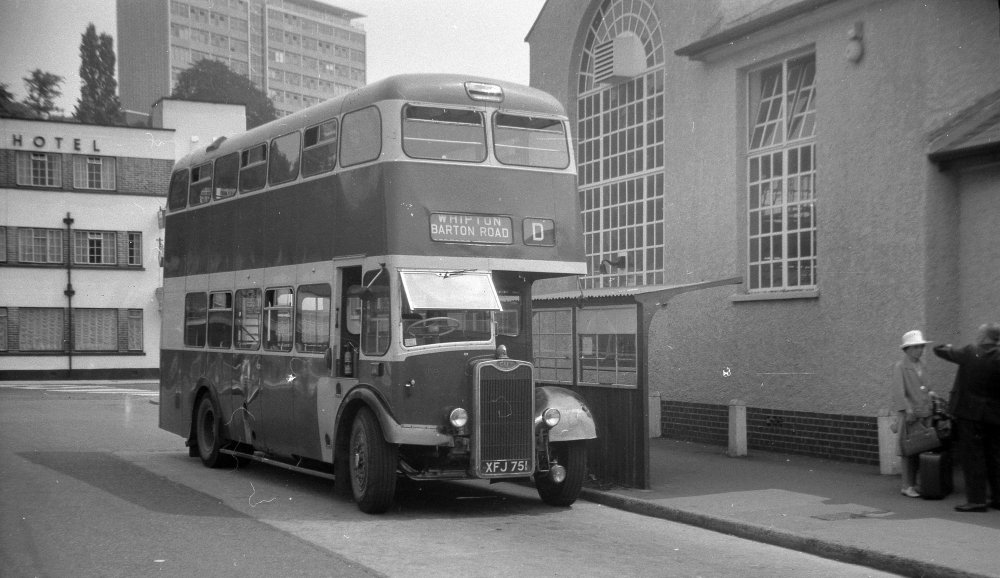 As a Brucey Bonus, here's XFJ 751, an Exeter Corporation Guy Arab IV with Weyman H31/26R
bodywork spotted in June 1970 on route D to Whipton Barton Road.
As a Brucey Bonus, here's XFJ 751, an Exeter Corporation Guy Arab IV with Weyman H31/26R
bodywork spotted in June 1970 on route D to Whipton Barton Road.
![]()
 Here's a couple of recent snaps showing the progress at Wood End Sidings, with more
foliage and ground cover having been added.
Here's a couple of recent snaps showing the progress at Wood End Sidings, with more
foliage and ground cover having been added.
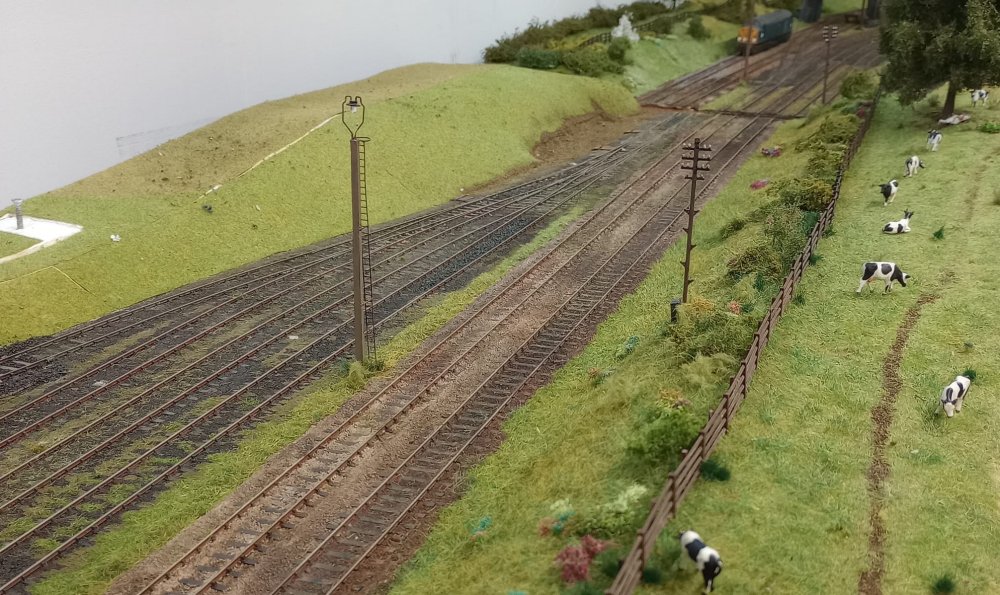 With the nearest baseboard being turned around, it's given me the opportunity to populate
the field at the rear of the layout with cows.
With the nearest baseboard being turned around, it's given me the opportunity to populate
the field at the rear of the layout with cows.
![]()
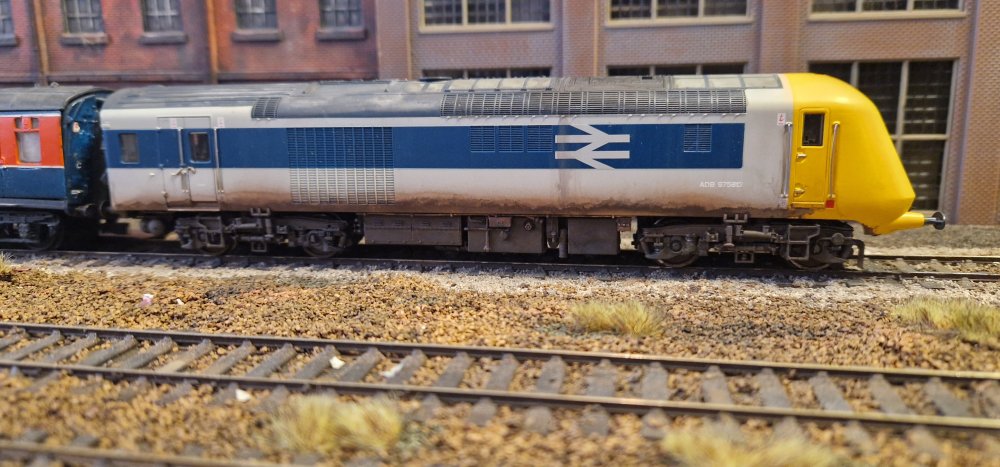 Ever since the mid 1970s I was absolutely fascinated by the Prototype HST and I made a whitemetal
kit of it a few years ago. I did by chance managed to scoop one off ebay recently, which is a
pre-production test model from Bachmann, so it has a couple of differences to the recently
released model. I've weathered it using my usual techniques, copying the very dirty tide mark
line it had during its departmental days powering the APT P test train.
Ever since the mid 1970s I was absolutely fascinated by the Prototype HST and I made a whitemetal
kit of it a few years ago. I did by chance managed to scoop one off ebay recently, which is a
pre-production test model from Bachmann, so it has a couple of differences to the recently
released model. I've weathered it using my usual techniques, copying the very dirty tide mark
line it had during its departmental days powering the APT P test train.
![]()
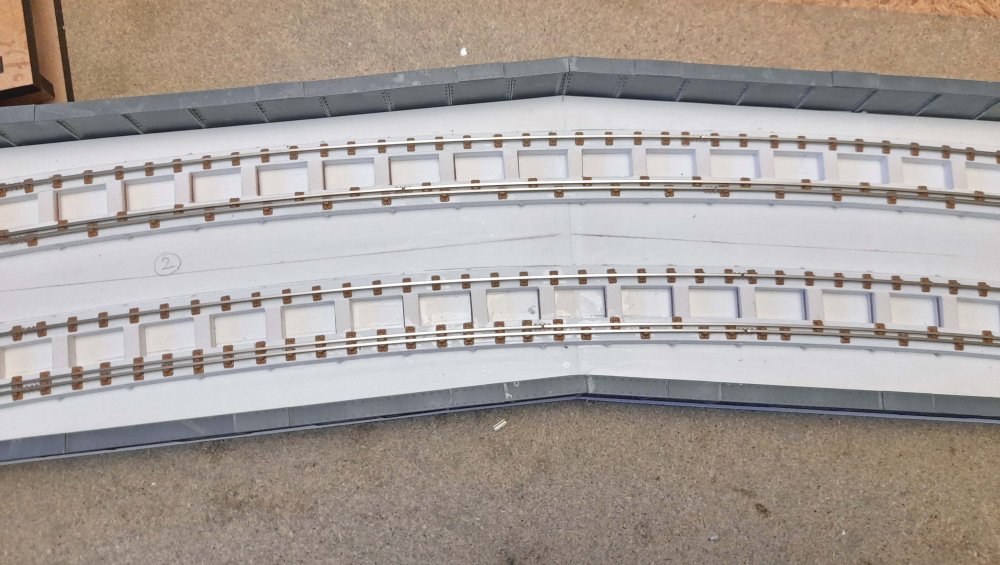
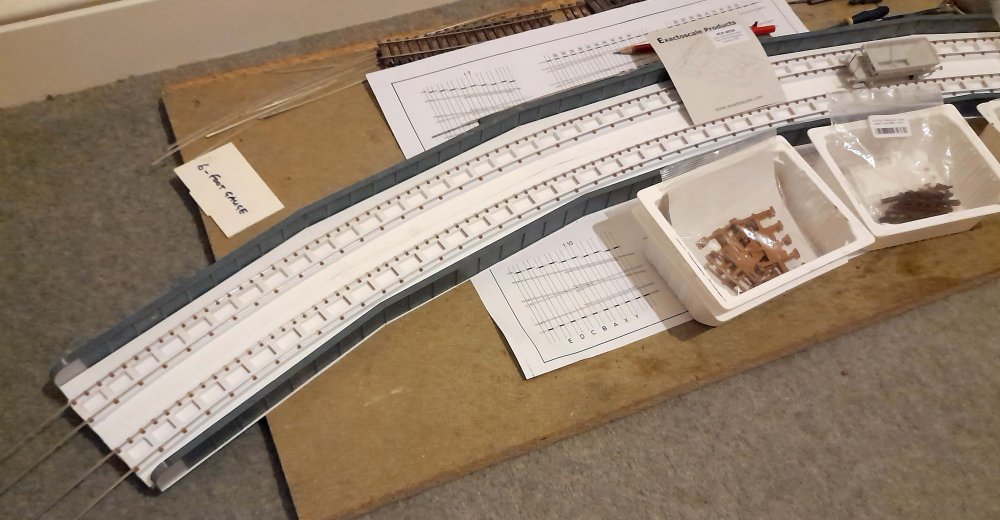 Trackwork in progress on the viaduct. The outer rails on each line were straightforward
using Exactoscale 3 bolt chairs. For the inner rails which have a continuous checkrail a
slightly different approach was adopted. I decided not to simply use the Exactoscale check
chairs as they come, for two reasons. Firstly, I thought it might be difficult to slide in
the checkrail over such a long length after the running rail had been laid. Secondly, I
was concerned the 0.8mm flangeway gap would cause sideplay issues around the curve. The
solution is a bit easier to understand from the photos than it is to describe. Basically,
thread check chairs onto the main rail at every other position, then cut off the bit that
encloses the check rail itself. Once the main rail was in place (as in this first photo),
the same was done for the check rail, in the alternate positions, obviously. The check rail
could then be fixed into position and then finally the ‘half chairs’ could then be fixed in
the required positions to complete everything.
Trackwork in progress on the viaduct. The outer rails on each line were straightforward
using Exactoscale 3 bolt chairs. For the inner rails which have a continuous checkrail a
slightly different approach was adopted. I decided not to simply use the Exactoscale check
chairs as they come, for two reasons. Firstly, I thought it might be difficult to slide in
the checkrail over such a long length after the running rail had been laid. Secondly, I
was concerned the 0.8mm flangeway gap would cause sideplay issues around the curve. The
solution is a bit easier to understand from the photos than it is to describe. Basically,
thread check chairs onto the main rail at every other position, then cut off the bit that
encloses the check rail itself. Once the main rail was in place (as in this first photo),
the same was done for the check rail, in the alternate positions, obviously. The check rail
could then be fixed into position and then finally the ‘half chairs’ could then be fixed in
the required positions to complete everything.
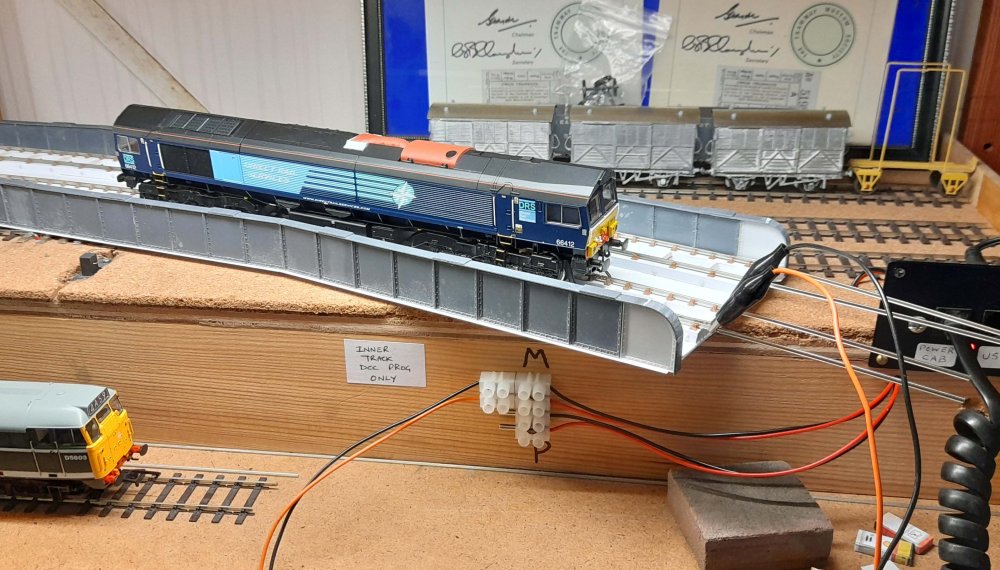 When positioning the check rail, I did a check there would be enough of a gap by running
some locos around the temporarily wired-up track. This Class 66 seemed to be the longest
wheelbase in my loco collection.
When positioning the check rail, I did a check there would be enough of a gap by running
some locos around the temporarily wired-up track. This Class 66 seemed to be the longest
wheelbase in my loco collection.
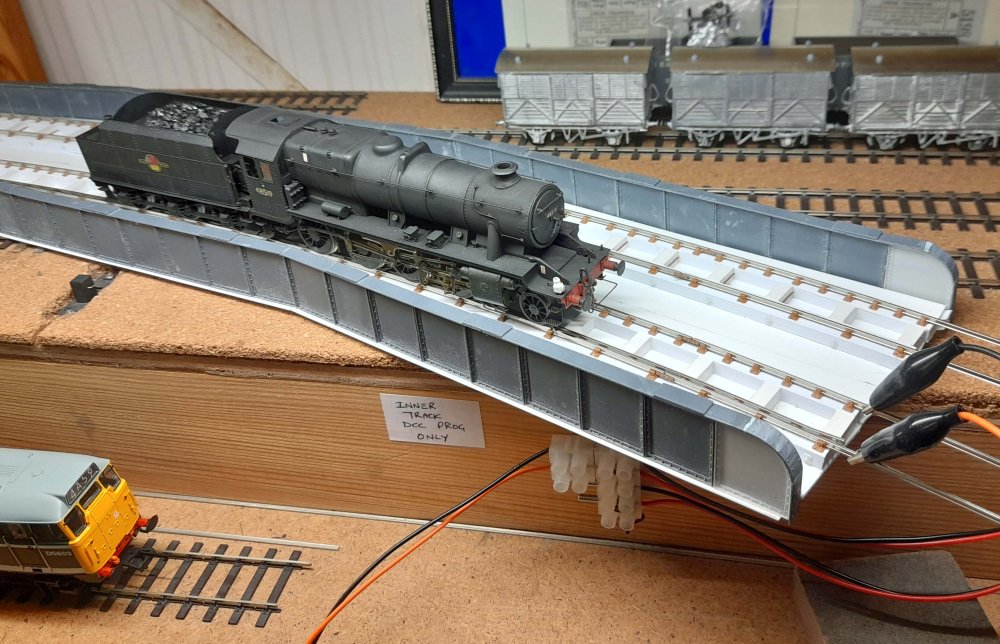 And here an 8F with 4 axles to get round. I ended up with around a 1.25mm gap, which to be
honest is quite noticeable when you look closely, but viewing from the side on the layout
should be fine. The final test of course will be when the viaduct actually gets fitted to the
layout, but I really don’t want to have to start making alterations to the track at that late stage.
And here an 8F with 4 axles to get round. I ended up with around a 1.25mm gap, which to be
honest is quite noticeable when you look closely, but viewing from the side on the layout
should be fine. The final test of course will be when the viaduct actually gets fitted to the
layout, but I really don’t want to have to start making alterations to the track at that late stage.
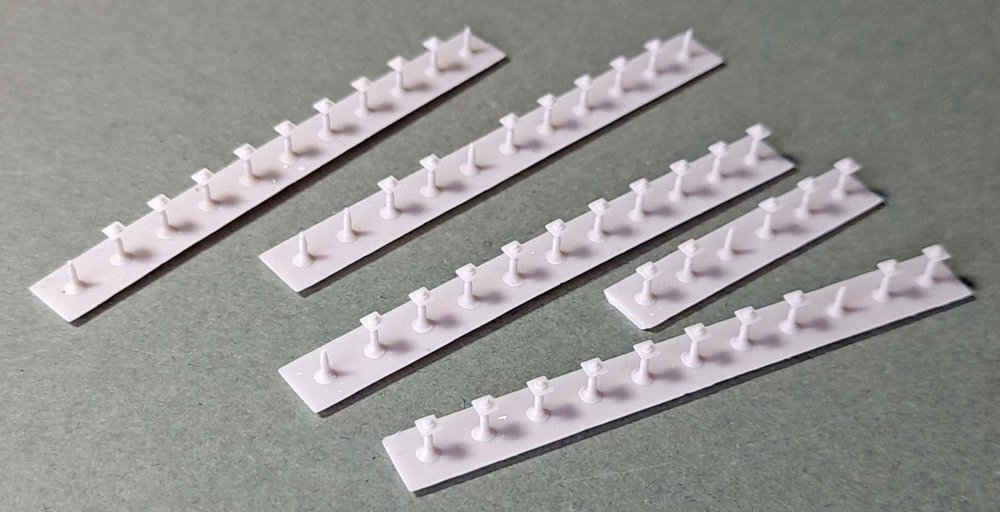 Not too visible in the preceding photos are the ends of the tie-rods between the timber
baulks supporting the rails. I drew these up in Fusion 360 and 3D printed them and then
fitted to the woodwork with cyano adhesive.
Not too visible in the preceding photos are the ends of the tie-rods between the timber
baulks supporting the rails. I drew these up in Fusion 360 and 3D printed them and then
fitted to the woodwork with cyano adhesive.
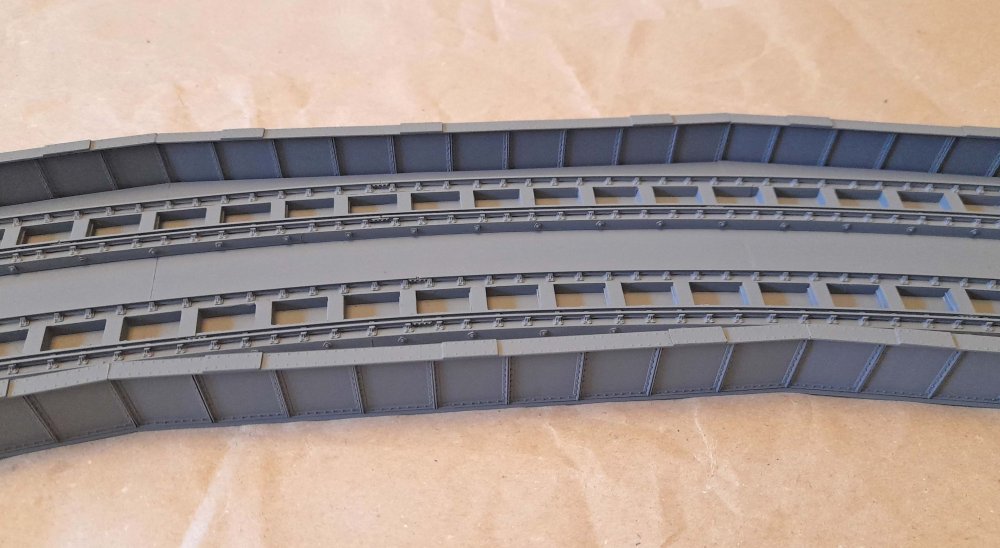
 Viaduct with completing the railchairs in progress. On the outer track and the RH side of
the inner track you can see the alternate chairing described earlier to deal with the check
rails. On the LH side of the inner track, the ‘half chairs’ are in the process of being
fitted, restoring the effect of complete check chairs, even though each has been cut in two.
As stated, this allowed the provision of a slightly wider than normal check rail spacing from the main rail.
Viaduct with completing the railchairs in progress. On the outer track and the RH side of
the inner track you can see the alternate chairing described earlier to deal with the check
rails. On the LH side of the inner track, the ‘half chairs’ are in the process of being
fitted, restoring the effect of complete check chairs, even though each has been cut in two.
As stated, this allowed the provision of a slightly wider than normal check rail spacing from the main rail.
 On with painting – initially an overall application of Hycote grey primer rattle can. The
tie rod ends show up better in this view.
On with painting – initially an overall application of Hycote grey primer rattle can. The
tie rod ends show up better in this view.
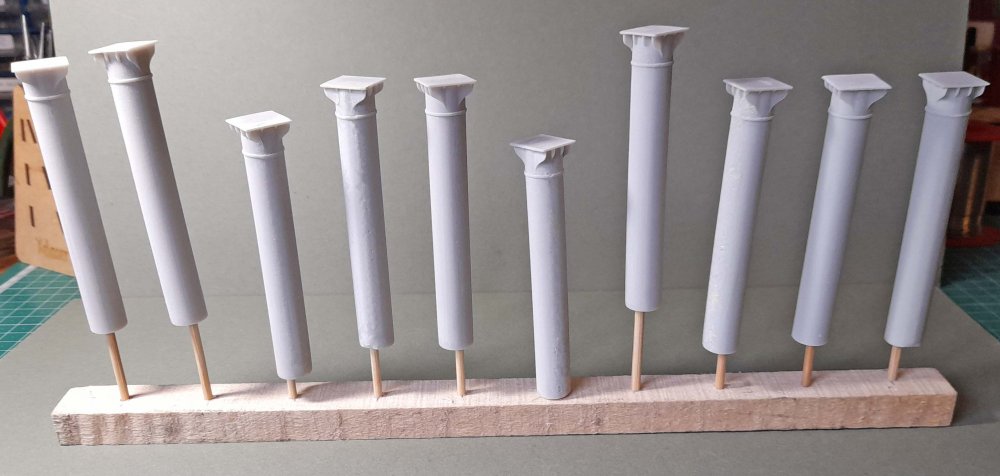 Similarly, the columns were painted likewise, using this simple stand to hold them.
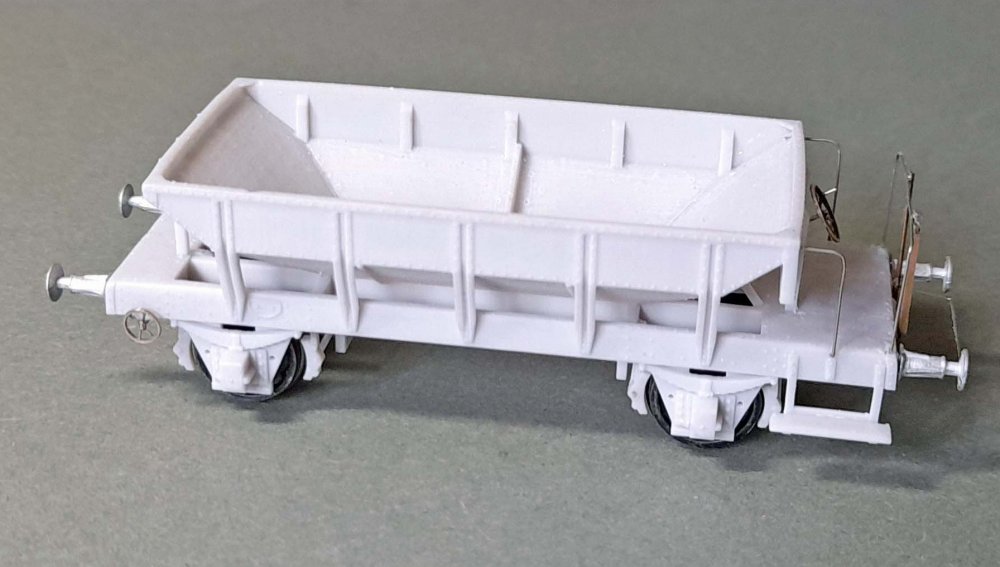 By way of contrast to all this viaduct stuff, while playing with the 3D printer I ran off
this BR Mackerel ballast hopper from Thingiverse, I believe one of Jonny’s works of art.
To match my existing stock, I used etched handwheels (Colin Craig) and whitemetal buffers
(Lanarkshire). Plus, I managed to snap off the end handrail stanchions and so replaced
these with brass section. It will be interesting when completed to see it compared with
the Mackerel I produced from a Hornby Trout.
By way of contrast to all this viaduct stuff, while playing with the 3D printer I ran off
this BR Mackerel ballast hopper from Thingiverse, I believe one of Jonny’s works of art.
To match my existing stock, I used etched handwheels (Colin Craig) and whitemetal buffers
(Lanarkshire). Plus, I managed to snap off the end handrail stanchions and so replaced
these with brass section. It will be interesting when completed to see it compared with
the Mackerel I produced from a Hornby Trout.
![]()
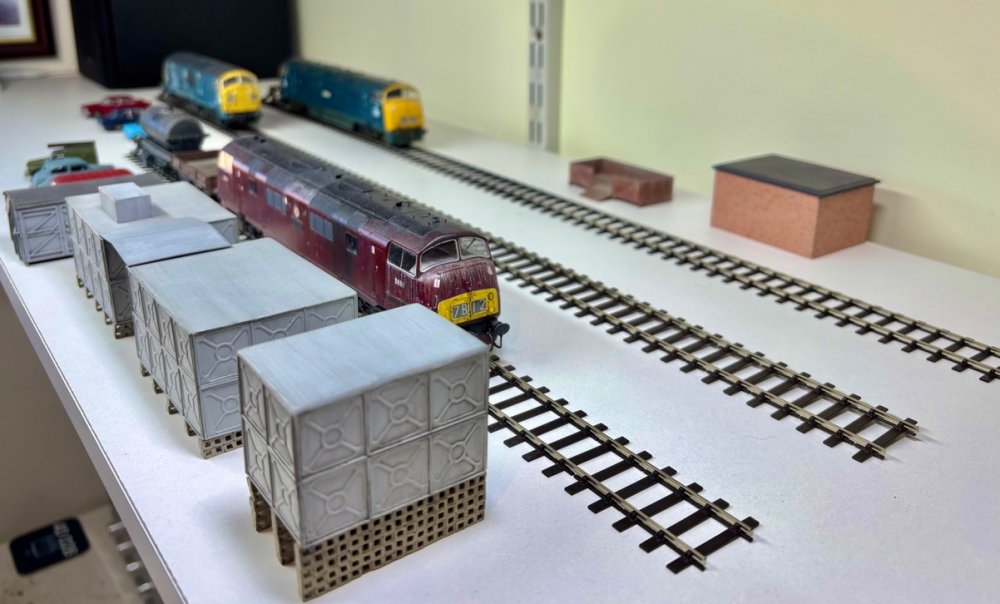
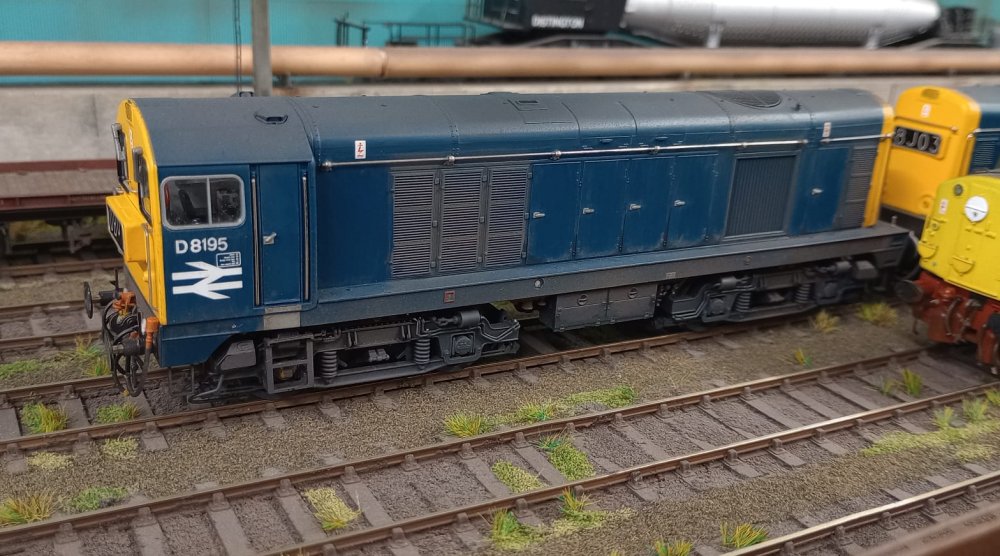 There's been a few new additions to the motive power fleet at Shenston Road, starting
off with D8195 - A Nottingham Division allocated Class 20 (Bachmann).
There's been a few new additions to the motive power fleet at Shenston Road, starting
off with D8195 - A Nottingham Division allocated Class 20 (Bachmann).
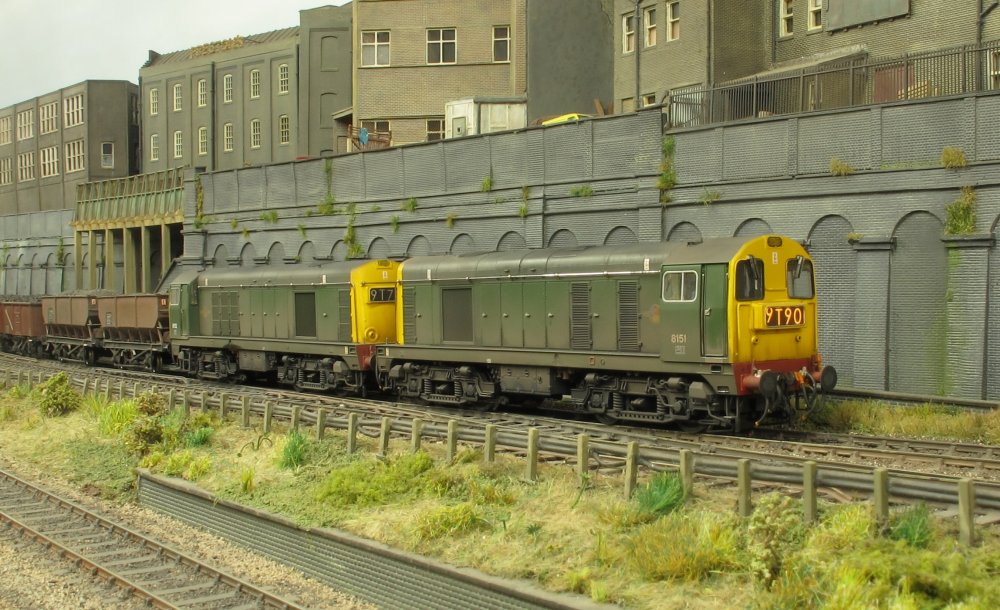 Two additional Nottingham Division Class 20s have also joined the fleet, as seen here at
Hornsey Broadway. Both sound fitted - 8151 with a Bachmann factory fitted decoder and 8152
with a Legomanbiffo decoder producing slightly different sound, and both matched for performance.
Two additional Nottingham Division Class 20s have also joined the fleet, as seen here at
Hornsey Broadway. Both sound fitted - 8151 with a Bachmann factory fitted decoder and 8152
with a Legomanbiffo decoder producing slightly different sound, and both matched for performance.
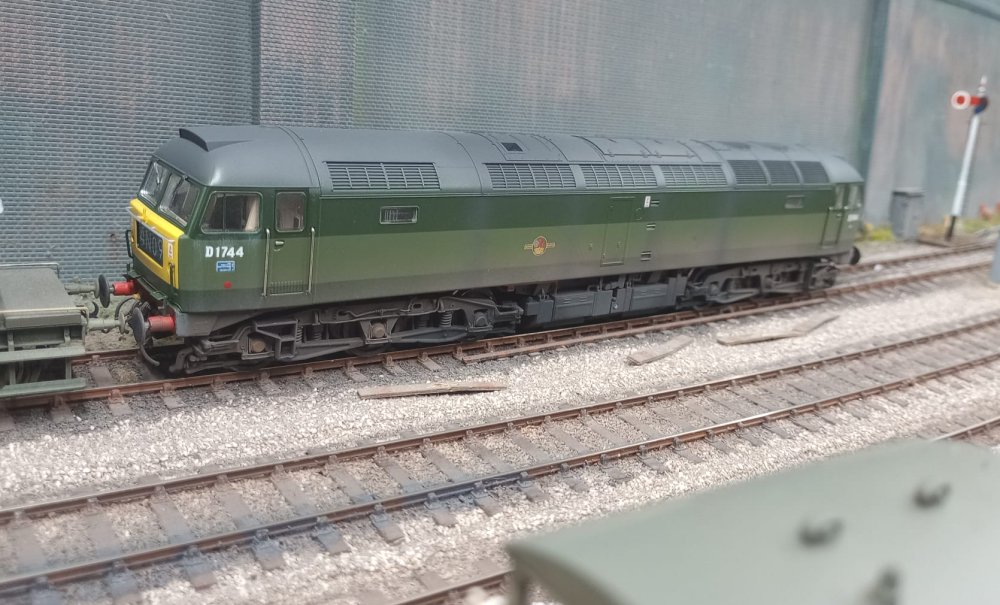 D1744 is a Stoke Division allocated Brush type 4 - a Bachmann model with Legomanbiffo sound.
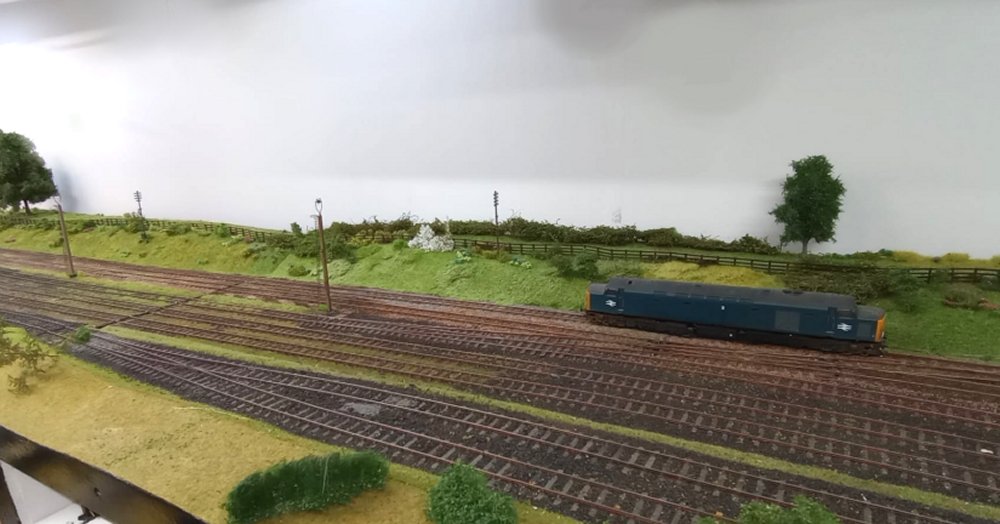
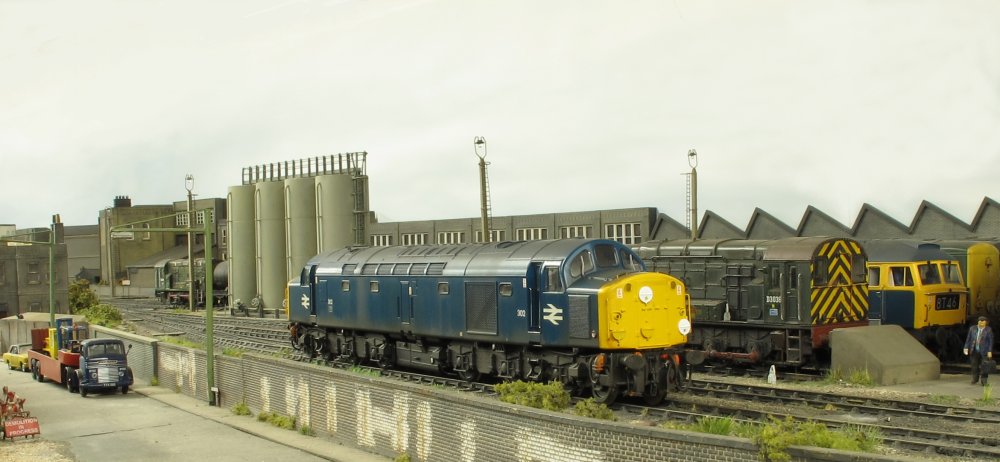 Another Class 40 number 302 has also joined the fleet, captured here at Hornsey Road depot.
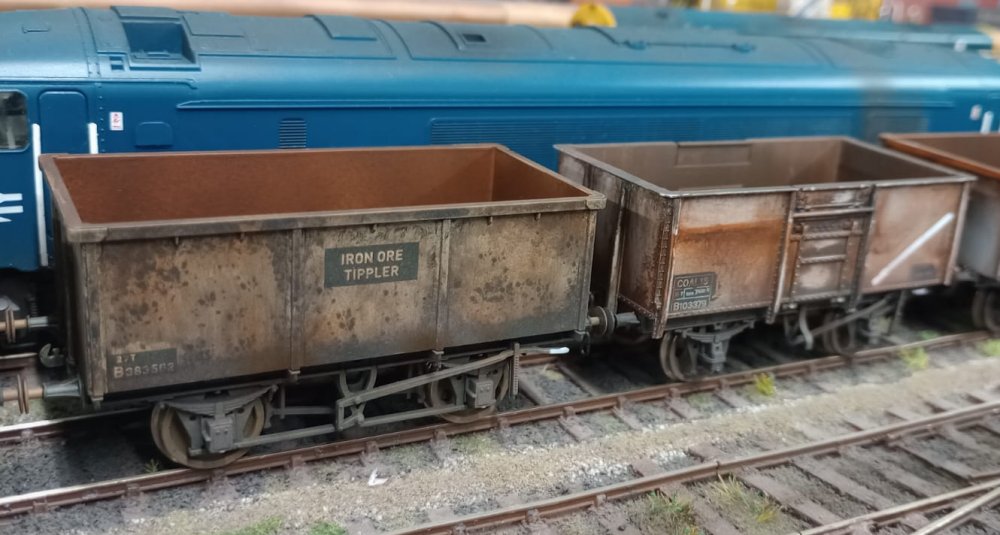 A couple of new wagons also joining the fleet have recently been weathered from photographs.
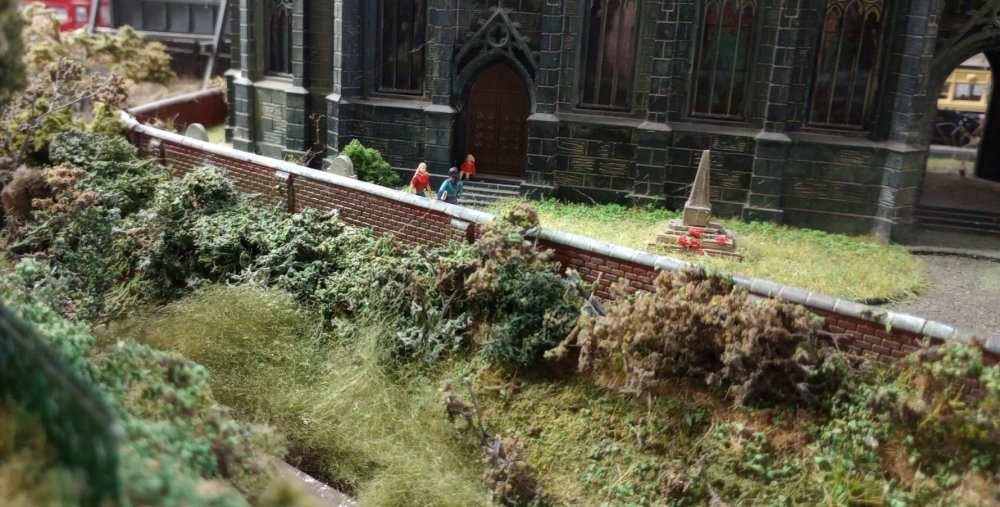 To finish off this month's contribution from Shenston Road, here's a couple of snaps taken
during a tour of the area. A view of the south side of the churchyard looking across the culvert....
To finish off this month's contribution from Shenston Road, here's a couple of snaps taken
during a tour of the area. A view of the south side of the churchyard looking across the culvert....
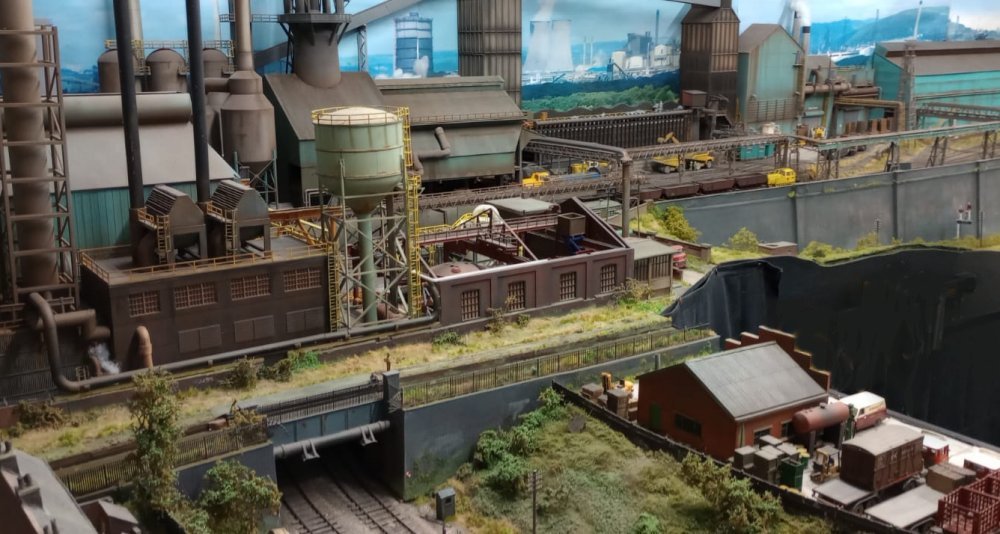 ... and another view of part of the steelworks taken from the same vantage point.
![]()
 Resuming the Newton Abbot works yard project so that it fits in between the 2 speakers
in the railway room. The baseboards await construction, so for now I've measured and cut
the track to length.
Resuming the Newton Abbot works yard project so that it fits in between the 2 speakers
in the railway room. The baseboards await construction, so for now I've measured and cut
the track to length.
 The works building and traverser have already been built, so the yard can be built as a separate
layout. Luckily I had all the track lengths measured after a visit to the site a few years ago.
The works building and traverser have already been built, so the yard can be built as a separate
layout. Luckily I had all the track lengths measured after a visit to the site a few years ago.
 Hopefully it won't be too long before it's operational, and the locomotives will be able to
be lifted on and off by hand.
Hopefully it won't be too long before it's operational, and the locomotives will be able to
be lifted on and off by hand.
![]()
 Modellers of all persuasions are heavily reliant on RTR locomotives these days and our
expectations are incredibly high – anything less than 100% perfect simply doesn’t make the cut.
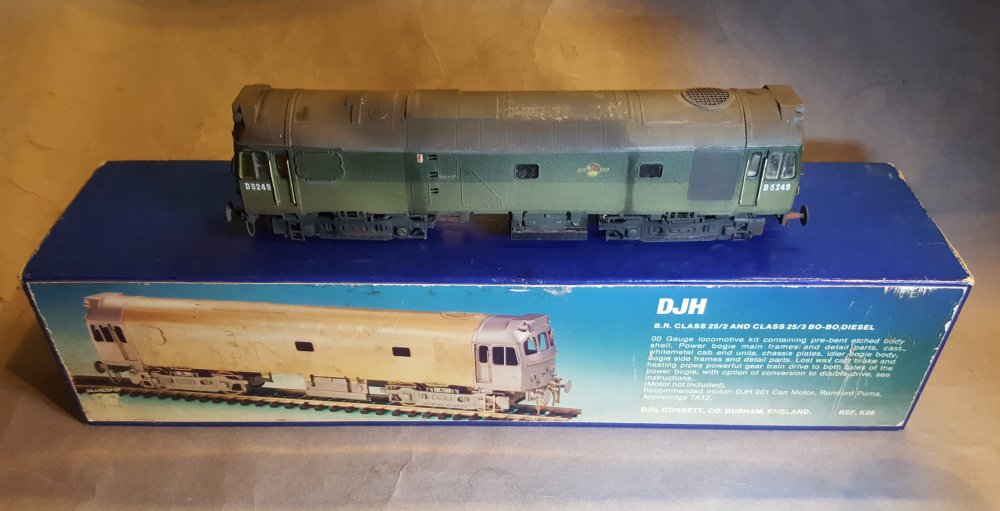
So if you’re feeling in any way critical there’s plenty to find fault with here – a recent
reworking of an elderly kit-built loco from DJH Engineering of Consett. It dates from the
late 1980s and I bought it, pre-assembled, for not very much at all, rich in promise but
badly in need of care and attention.
Modellers of all persuasions are heavily reliant on RTR locomotives these days and our
expectations are incredibly high – anything less than 100% perfect simply doesn’t make the cut.
So if you’re feeling in any way critical there’s plenty to find fault with here – a recent
reworking of an elderly kit-built loco from DJH Engineering of Consett. It dates from the
late 1980s and I bought it, pre-assembled, for not very much at all, rich in promise but
badly in need of care and attention.
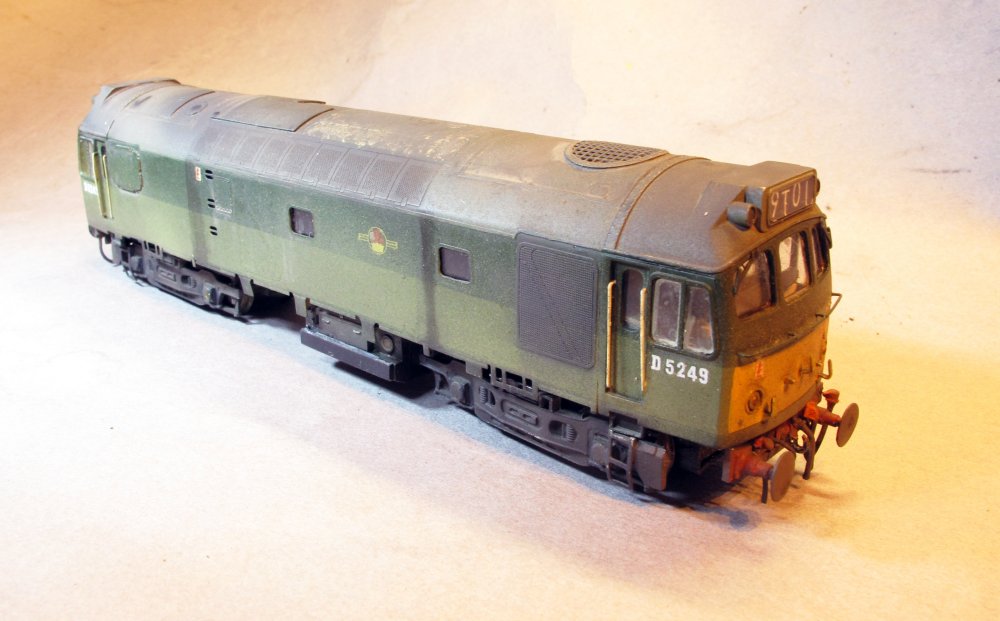 In terms of the development of our hobby, I see this 25/2 as an authentic slice of history, a
bold experiment at a time when finescale modelling was really taking off and the hand-built
locomotive took centre stage. Four decades on, with stiff competition from Bachmann, Heljan
and SLW, it is what it is. But I think you’ll agree that, after a few hours’
worth of tidying-up, renumbering, re-glazing, weathering and a full mechanical / electrical
overhaul, it looks okay. It certainly runs and pulls well and it was enormous fun to restore
it to an operable condition.
In terms of the development of our hobby, I see this 25/2 as an authentic slice of history, a
bold experiment at a time when finescale modelling was really taking off and the hand-built
locomotive took centre stage. Four decades on, with stiff competition from Bachmann, Heljan
and SLW, it is what it is. But I think you’ll agree that, after a few hours’
worth of tidying-up, renumbering, re-glazing, weathering and a full mechanical / electrical
overhaul, it looks okay. It certainly runs and pulls well and it was enormous fun to restore
it to an operable condition.
 Despite a few anomalies in the roof detailing, all the main dimensions and proportions check out
but there were some strange design elements to contend with. According to a friend who was in a
senior position with DJH, it was ‘the worst kit we ever produced’. Very much a step in the dark
for the company, the basic bodyshell is a pre-formed sheet of etched brass but the cab ends are
cast in pewter, quite a hard grade compared with the bendy mush with which some kit manufacturers
have fobbed us off. Joining the two metals and ensuring they stay joined is not easy.
Despite a few anomalies in the roof detailing, all the main dimensions and proportions check out
but there were some strange design elements to contend with. According to a friend who was in a
senior position with DJH, it was ‘the worst kit we ever produced’. Very much a step in the dark
for the company, the basic bodyshell is a pre-formed sheet of etched brass but the cab ends are
cast in pewter, quite a hard grade compared with the bendy mush with which some kit manufacturers
have fobbed us off. Joining the two metals and ensuring they stay joined is not easy.
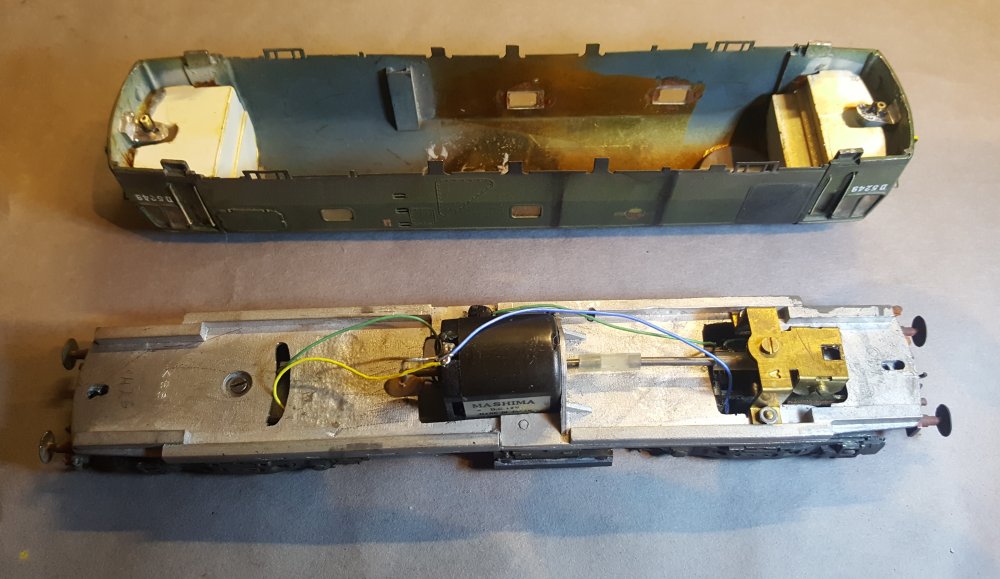
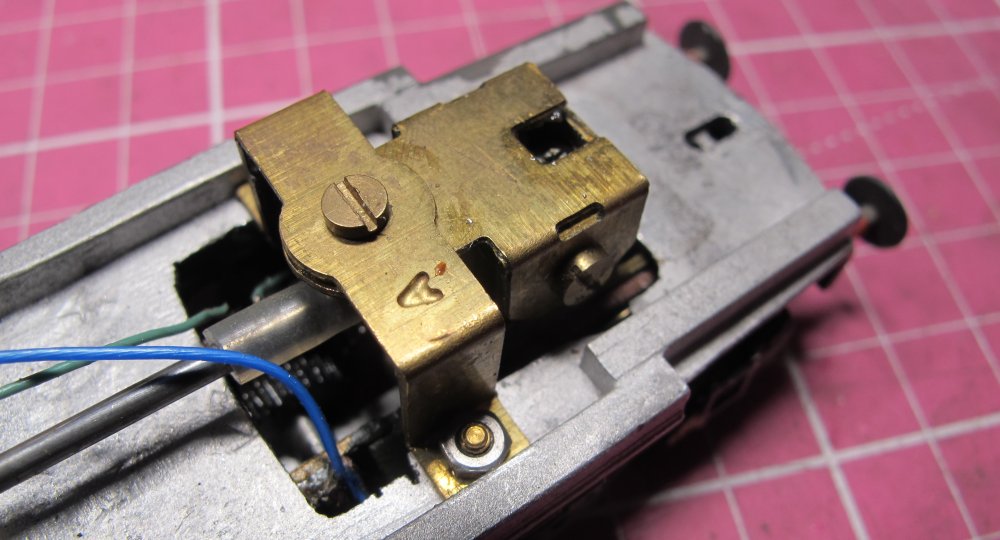 The basic chassis is two solid castings soldered back to back, with the resulting propensity to
sag – no great problem with the two-part floor of a Cambrian bogie bolster kit but quite an issue
with such a heavy working machine. The loco now picks up on all eight wheels, but only four are
powered even if the use of a Mashima 1624 flat can – one of my favourites – ensures there’s still
plenty of grunt. Bogies are a whitemetal fabrication, more than a bit lumpen by today’s standards.
The gears are brass, hefty and surprisingly quiet. There was a strong whiff of Castrol about the
place when I first unpacked the loco.
The basic chassis is two solid castings soldered back to back, with the resulting propensity to
sag – no great problem with the two-part floor of a Cambrian bogie bolster kit but quite an issue
with such a heavy working machine. The loco now picks up on all eight wheels, but only four are
powered even if the use of a Mashima 1624 flat can – one of my favourites – ensures there’s still
plenty of grunt. Bogies are a whitemetal fabrication, more than a bit lumpen by today’s standards.
The gears are brass, hefty and surprisingly quiet. There was a strong whiff of Castrol about the
place when I first unpacked the loco.
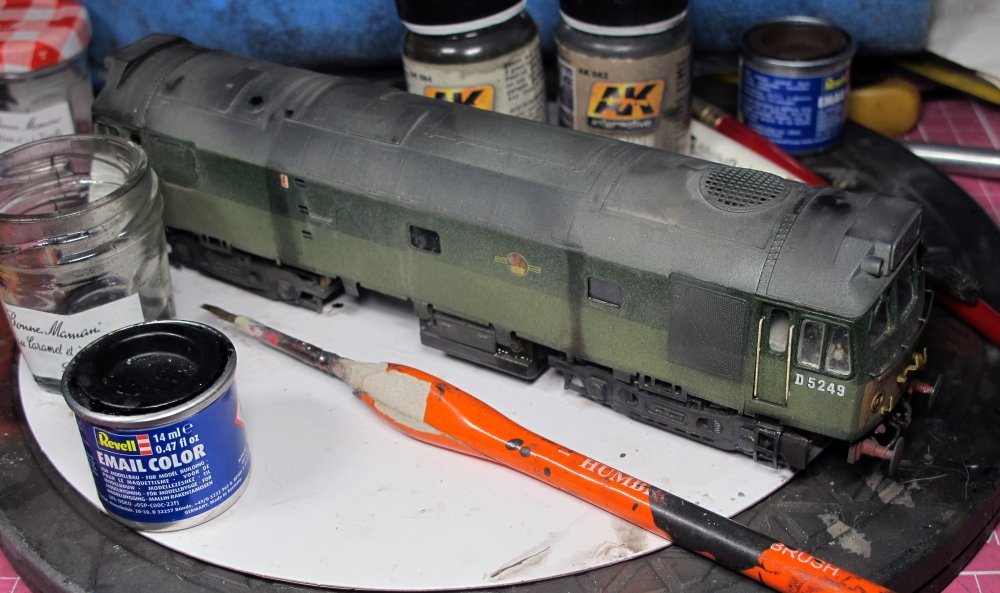 Weathering and distressing played a big part in the transformation of the model, and bringing it
to life. It had already received an unconvincing ‘light weathering’ with the usual speckle of
brown paint over the upper works. I went over it again in airbrushed acrylics using a photo as
a guide and then, the following day, added thin washes of enamel paint, allowing dirt to
accumulate in out-of-the-way places. Graphics are from Railtec Transfers.
Weathering and distressing played a big part in the transformation of the model, and bringing it
to life. It had already received an unconvincing ‘light weathering’ with the usual speckle of
brown paint over the upper works. I went over it again in airbrushed acrylics using a photo as
a guide and then, the following day, added thin washes of enamel paint, allowing dirt to
accumulate in out-of-the-way places. Graphics are from Railtec Transfers.
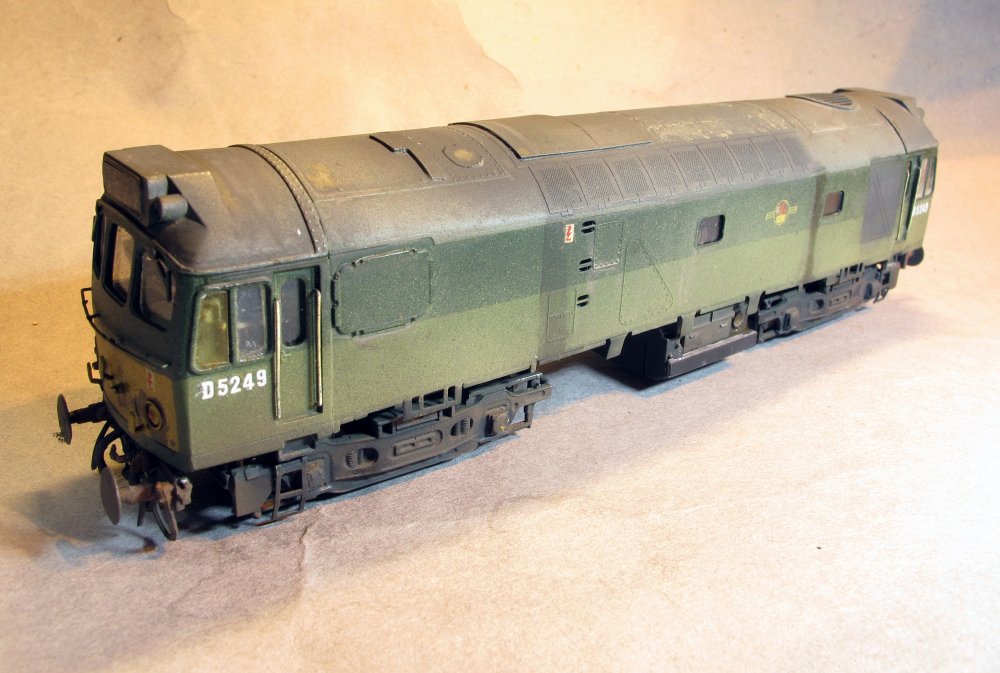 Unsurprisingly, this was the one and only kit for a main-line diesel that DJH ever produced.
They didn’t have much competition either – other than Dave Alexander (a superb pattern-maker,
one of the best) and Dave Sharpe of Modern Outline Kits, there were very few designers who made
serious attempts to move diesel modelling away from the abyss that was MTK, and no one has
followed in their footsteps. As a result, RTR has become the universal starting point and the idea
of full-on loco kits like my 25/2 has been quietly buried amid the archaeology of diesel-era modelling.
Unsurprisingly, this was the one and only kit for a main-line diesel that DJH ever produced.
They didn’t have much competition either – other than Dave Alexander (a superb pattern-maker,
one of the best) and Dave Sharpe of Modern Outline Kits, there were very few designers who made
serious attempts to move diesel modelling away from the abyss that was MTK, and no one has
followed in their footsteps. As a result, RTR has become the universal starting point and the idea
of full-on loco kits like my 25/2 has been quietly buried amid the archaeology of diesel-era modelling.
![]()
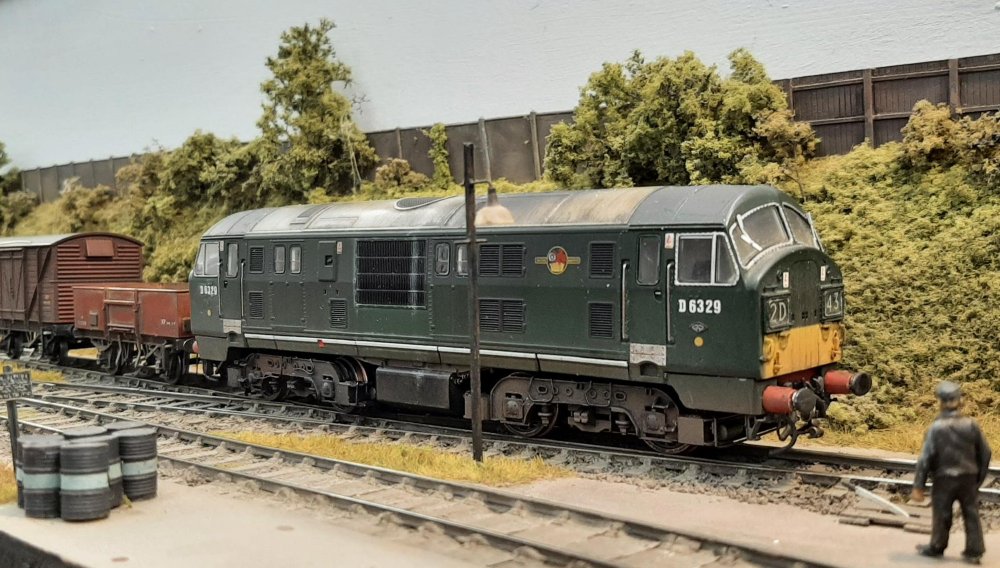 A Class 22 shunts a few wagons. This Dapol model has had the split axles replaced with full
width axles and new wiper pickups which has solved the occasional problem the original setup caused.
A Class 22 shunts a few wagons. This Dapol model has had the split axles replaced with full
width axles and new wiper pickups which has solved the occasional problem the original setup caused.
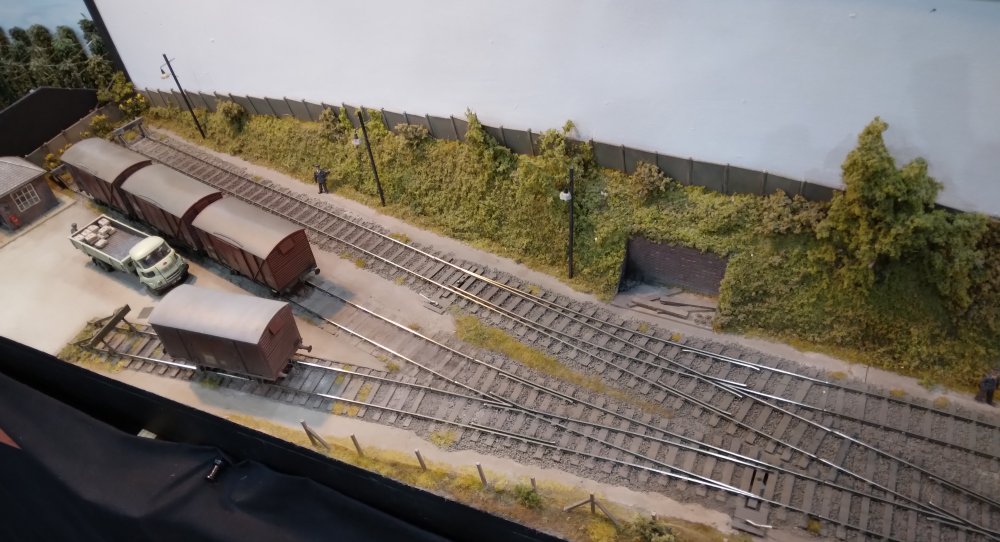 A view of the yard, very short sidings but makes shunting stock interesting!
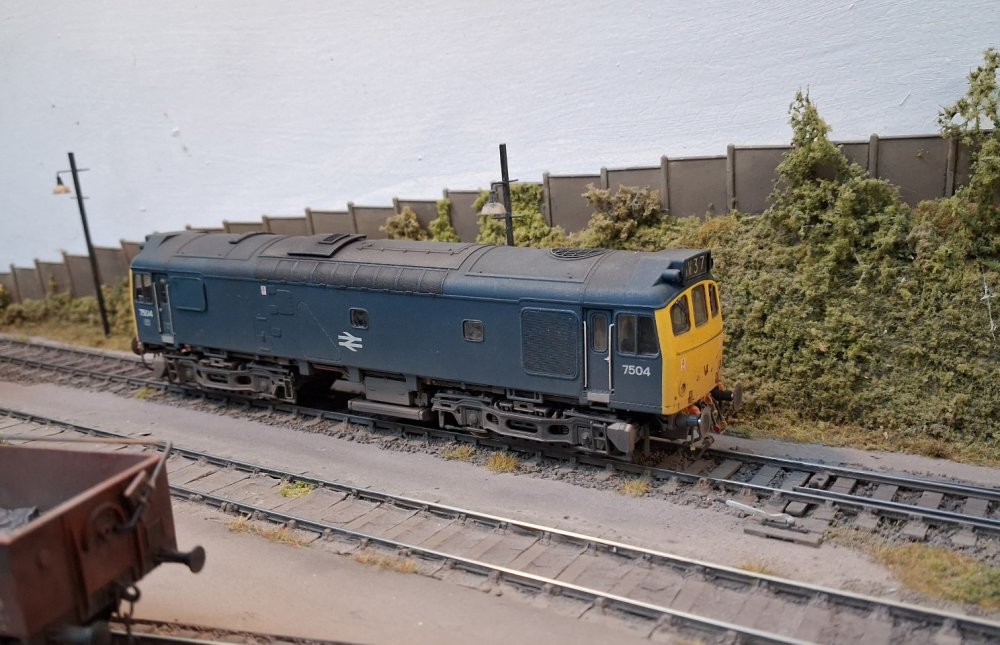 A recent addition is a Heljan Class 25 re-numbered to represent a Western region loco that
replaced the Class 22s. It is an excellent runner and also DCC sound fitted.
A recent addition is a Heljan Class 25 re-numbered to represent a Western region loco that
replaced the Class 22s. It is an excellent runner and also DCC sound fitted.
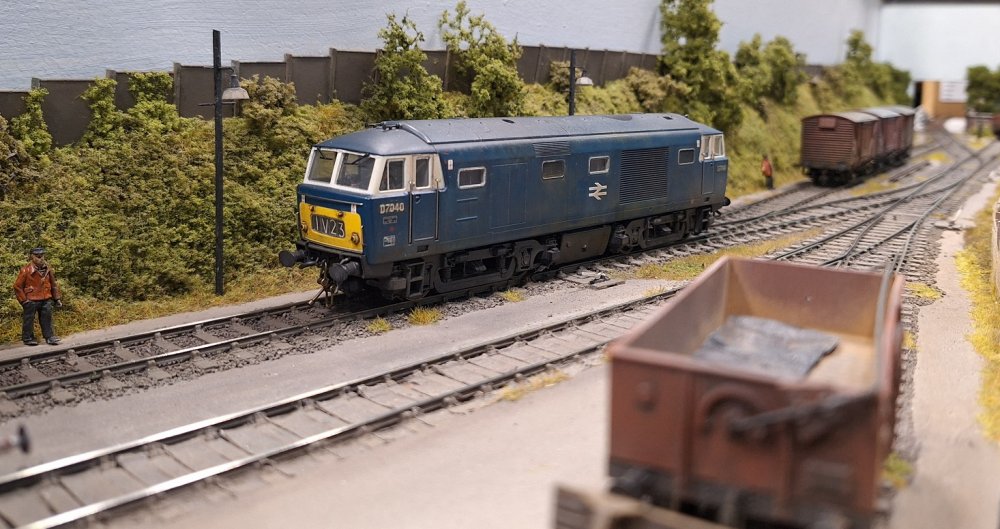 Hymek D7040 shunts a few wagons. Thanks to Tim and Steve for the photos.
Sheepcroft will be at the Abingdon (ABRAIL) show on the 7th & 8th of March.
2026 expoEM Spring Show to a new venue in Bracknell as follows: