*********************************************************************************************************************************************
NOVEMBER 2023 UPDATE
*********************************************************************************************************************************************
STEVE HARROD
*********************************************************************************************************************************************
IAN MANDERSON
*********************************************************************************************************************************************
MIKE WHITCHURCH
*********************************************************************************************************************************************
JONNY DUFFETT
All my 3D designs are available as a free download at
Thingiverse
for you to print yourself, or alternatively Scale Model Innovations, NIU Models, and
Milepost 128 Models *********************************************************************************************************************************************
GREG BROOKES
*********************************************************************************************************************************************
KARL CROWTHER
*********************************************************************************************************************************************
ANDY LEE
*********************************************************************************************************************************************
KIER HARDY
*********************************************************************************************************************************************
![]()
 I started this North British D6323 project at the beginning of the year, however
I have managed to get back into the model room and finish off this project.
Here's a couple of broadside shots showing the weathering which has been
carried out using enamel paints.
I started this North British D6323 project at the beginning of the year, however
I have managed to get back into the model room and finish off this project.
Here's a couple of broadside shots showing the weathering which has been
carried out using enamel paints.
 I had previously added the head codes and cut out all the glazing ready for fitting.
Next on the list is to add the pressfix numbers & correct OHLW flashes, then fit
the cab glazing and the rebuilt cab interiors. Seen here next to sister loco 6322.
I had previously added the head codes and cut out all the glazing ready for fitting.
Next on the list is to add the pressfix numbers & correct OHLW flashes, then fit
the cab glazing and the rebuilt cab interiors. Seen here next to sister loco 6322.
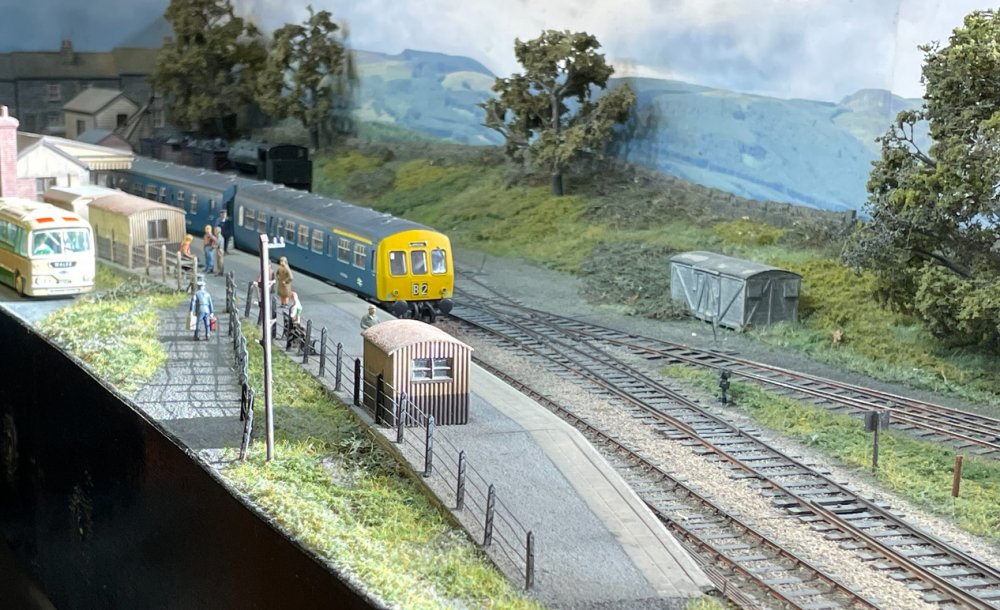 Whilst at the recent Cheltenham model railway exhibition where I was demonstrating
and showcasing my Gauge 1 diesel hydraulic modelling techniques, I took the opportunity
to photograph the EM gauge layout Morfa Mawr, exhibited by Ian & Michelle Sandell.
Whilst at the recent Cheltenham model railway exhibition where I was demonstrating
and showcasing my Gauge 1 diesel hydraulic modelling techniques, I took the opportunity
to photograph the EM gauge layout Morfa Mawr, exhibited by Ian & Michelle Sandell.
 The layout was originally built by Trevor Hale, and has been previously featured
within the pages of this website.
The layout was originally built by Trevor Hale, and has been previously featured
within the pages of this website.
 Hymek D7078 carries out the day's shunting duties at Morfa Mawr.
![]()
 Hartburn appeared at the Cheltenham model railway exhibition. Here's a few snaps
taken at the show by Steve Harrod and myself. BR Derby type 2 (Class 24) D5149 is seen
here with a brake van in tow.
Hartburn appeared at the Cheltenham model railway exhibition. Here's a few snaps
taken at the show by Steve Harrod and myself. BR Derby type 2 (Class 24) D5149 is seen
here with a brake van in tow.
 Ivatt 4MT 2-6-0 43063 is captured at the station in charge of a mixed freight.
 J25 0-6-0 number 65645 hauling a train of vans through the station.
 A shakey camera-phone snap of a Met-Cam 2-car DMU on a local service.
 4MT 43063 is seen again departing Hartburn, whilst a tractor driver chats to a fellow
resident until the gates can be opened again for road traffic.
4MT 43063 is seen again departing Hartburn, whilst a tractor driver chats to a fellow
resident until the gates can be opened again for road traffic.
 Bedford RL Territorial Army vehicles on their way to the Otterburn ranges by Lowmac,
as built by Pete Johnson specifically for Hartburn. A big thank you to those who
stopped by and chatted during the weekend, and a special thanks to Carole for the
loan of the rolling stock.
Bedford RL Territorial Army vehicles on their way to the Otterburn ranges by Lowmac,
as built by Pete Johnson specifically for Hartburn. A big thank you to those who
stopped by and chatted during the weekend, and a special thanks to Carole for the
loan of the rolling stock.
![]()
 With the passing of the extremely hot weather over here in Spain, attention has returned
to the layout after a couple of months of wagon building / converting / respraying. As
the layout has been split at the goods yard, I now have the potential for 2 independent
yards, so I'm now at the design stage.
With the passing of the extremely hot weather over here in Spain, attention has returned
to the layout after a couple of months of wagon building / converting / respraying. As
the layout has been split at the goods yard, I now have the potential for 2 independent
yards, so I'm now at the design stage.
 As you will notice, I tend to design on the hoof by shuffling track pieces around until
I find a layout which works for me. The yards are built on the new extension boards which
will also accommodate the curved return tracks, hence the empty spaces on the insides of them.
As you will notice, I tend to design on the hoof by shuffling track pieces around until
I find a layout which works for me. The yards are built on the new extension boards which
will also accommodate the curved return tracks, hence the empty spaces on the insides of them.
 Yard 1 will have a parcels facility, and a mock up has been put in place to see how
it might look. This yard originally didn't exist, because as can be seen, it is fed
directly off the original yard throat.
Yard 1 will have a parcels facility, and a mock up has been put in place to see how
it might look. This yard originally didn't exist, because as can be seen, it is fed
directly off the original yard throat.
 Yard 2 is basically the old goods yard and will be fed from a turnout on the existing loop
line, an extension to allow headshunt facilities will extend through the door in the background.
Yard 2 is basically the old goods yard and will be fed from a turnout on the existing loop
line, an extension to allow headshunt facilities will extend through the door in the background.
![]()
 My latest drawing and 3D printing projects include the BR 24 Ton Iron Ore Hopper
dia 1/162. 1500 of these wagons were built in 1950, along with 1000 very similar
vehicles rated at 22 Tons.
My latest drawing and 3D printing projects include the BR 24 Ton Iron Ore Hopper
dia 1/162. 1500 of these wagons were built in 1950, along with 1000 very similar
vehicles rated at 22 Tons.
 The design dated back to a 1930s Charles Roberts vehicle for Private Owners and many
of these were taken into BR stock also. Up until now the only available models were
the widespread Mainline representation, or the old Ratio kit, both of which had
dimensional inaccuracies. The wagon here is 3D printed with etched end ladders and
wire footsteps.
The design dated back to a 1930s Charles Roberts vehicle for Private Owners and many
of these were taken into BR stock also. Up until now the only available models were
the widespread Mainline representation, or the old Ratio kit, both of which had
dimensional inaccuracies. The wagon here is 3D printed with etched end ladders and
wire footsteps.
 As a variation I have also drawn files for a Slag Ballast Hopper. This conversion of
the 24 Ton hopper involved the addition of raves, crew riding platforms and hopper
operating handwheels on both sides as opposed to the single sided lever on the original
design. These conversions seemed to be made from the ex Private Owner stock.
As a variation I have also drawn files for a Slag Ballast Hopper. This conversion of
the 24 Ton hopper involved the addition of raves, crew riding platforms and hopper
operating handwheels on both sides as opposed to the single sided lever on the original
design. These conversions seemed to be made from the ex Private Owner stock.
![]()
 Continuing with the 3D printed wagons theme, this month sees a trio of wagons for the
Shenston Road departmental fleet, starting with the LMS version of the Sole. Built in
2 batches of over 3000 wagons. They had drop sides and end doors which could be lowered
within the length of the buffers so extended loads of rail etc could be carried across several wagons.
Continuing with the 3D printed wagons theme, this month sees a trio of wagons for the
Shenston Road departmental fleet, starting with the LMS version of the Sole. Built in
2 batches of over 3000 wagons. They had drop sides and end doors which could be lowered
within the length of the buffers so extended loads of rail etc could be carried across several wagons.
 BR version Sole dia 1/565. BR built 500 after nationalisation with sturdier axleguards and
some with plate axleboxes.
BR version Sole dia 1/565. BR built 500 after nationalisation with sturdier axleguards and
some with plate axleboxes.
 The Haddock dia 1/621 shares the same underframe as the Sole, built by both the LMS and BR.
The body is longer than the Sole and has fixed ends. They were designed for transporting sleepers.
The Haddock dia 1/621 shares the same underframe as the Sole, built by both the LMS and BR.
The body is longer than the Sole and has fixed ends. They were designed for transporting sleepers.
![]()
 Progress at last on the remaining semaphores, this here being Kendal�s starter signal
for Platforms 2 & 3. The welded stem bracket is an etch from Wizard Models. I�ve been
tempted to have a go with some 3D printed, combined arm pivot/lamp parts that were
obtained from Shapeways. I haven�t used them before as I found the resin used is very
brittle and they had a tendency for the pivot to snap off when removing them from the
base they�re attached to. But with a bit of luck, several were removed complete and
attached to the posts with a generous amount of superglue. I�m hoping that now they�re
securely attached to the posts, they won�t fail in use. Intended as supplied for
illumination by fibre optics, I�ve had to drill them out (from the back) so I can
deploy my LEDs as on the other signals.
Progress at last on the remaining semaphores, this here being Kendal�s starter signal
for Platforms 2 & 3. The welded stem bracket is an etch from Wizard Models. I�ve been
tempted to have a go with some 3D printed, combined arm pivot/lamp parts that were
obtained from Shapeways. I haven�t used them before as I found the resin used is very
brittle and they had a tendency for the pivot to snap off when removing them from the
base they�re attached to. But with a bit of luck, several were removed complete and
attached to the posts with a generous amount of superglue. I�m hoping that now they�re
securely attached to the posts, they won�t fail in use. Intended as supplied for
illumination by fibre optics, I�ve had to drill them out (from the back) so I can
deploy my LEDs as on the other signals.
 Here we see the lattice post Platform 1 stater at Kendal, plus the tubular post down
home bracket for Heversham Junction. Again, the lattice post is Wizard Models as are
things such as the balance levers and the treads of the bracket platform. Otherwise,
the latter was scratchbuilt from various brass sections. LMS bracket signals tended
to be worked by torsion bars mounted along the front of the bracket horizontals. Below you
can see parts in preparation for these fittings � basically made up from strip fret waste.
Here we see the lattice post Platform 1 stater at Kendal, plus the tubular post down
home bracket for Heversham Junction. Again, the lattice post is Wizard Models as are
things such as the balance levers and the treads of the bracket platform. Otherwise,
the latter was scratchbuilt from various brass sections. LMS bracket signals tended
to be worked by torsion bars mounted along the front of the bracket horizontals. Below you
can see parts in preparation for these fittings � basically made up from strip fret waste.
 A cruel close-up of the torsion bar brackets and operating levers (actually 6 of the
latter were required). Basically, make one (drilled 0.5mm), shape with files and then
solder onto more strip to make identical copies. They�re a bit over-scale relative to
the real fittings, but a necessary compromise to make them workable. Ideally it would
be good to create these as etched parts but I went on the basis that in the time that
would be needed to create the artwork, I could fashion all I�d need from scratch.
A cruel close-up of the torsion bar brackets and operating levers (actually 6 of the
latter were required). Basically, make one (drilled 0.5mm), shape with files and then
solder onto more strip to make identical copies. They�re a bit over-scale relative to
the real fittings, but a necessary compromise to make them workable. Ideally it would
be good to create these as etched parts but I went on the basis that in the time that
would be needed to create the artwork, I could fashion all I�d need from scratch.
 Torsion bars (0.5mm nickel-silver wire), their supports and associated drive levers now
fitted to the Kendal platform bracket. A bit of trial and error was needed to get the
proportions right so that the levers didn�t catch on the face of the platform. Handrails
also added from 0.3mm nickel-silver wire.
Torsion bars (0.5mm nickel-silver wire), their supports and associated drive levers now
fitted to the Kendal platform bracket. A bit of trial and error was needed to get the
proportions right so that the levers didn�t catch on the face of the platform. Handrails
also added from 0.3mm nickel-silver wire.
 The Heversham bracket signal now completed. With three separate torsion bars this was
by far the most complex to put together. I just hope it all works! The ladders on all
the signals are the Masokits ones, while the safety hoops are made up from 0.5mm brass
wire filed into a flat strip. That now just leaves the 3-arm inner home bracket signal
to put together for Kendal. Next time perhaps?
The Heversham bracket signal now completed. With three separate torsion bars this was
by far the most complex to put together. I just hope it all works! The ladders on all
the signals are the Masokits ones, while the safety hoops are made up from 0.5mm brass
wire filed into a flat strip. That now just leaves the 3-arm inner home bracket signal
to put together for Kendal. Next time perhaps?
 About a year ago, a member of our Area Group (David Green) passed away and as a result
of this I acquired another Class 105 DMU � I thought it would be fitting to have
something of his running on the layout. Having a green example already I thought it
would be good to have one �half and half� so to speak, quite common in my mid-1960s
timeframe. A blue bodyshell was duly acquired from Bachmann Spares.
About a year ago, a member of our Area Group (David Green) passed away and as a result
of this I acquired another Class 105 DMU � I thought it would be fitting to have
something of his running on the layout. Having a green example already I thought it
would be good to have one �half and half� so to speak, quite common in my mid-1960s
timeframe. A blue bodyshell was duly acquired from Bachmann Spares.
 When I delved into the detail it was apparent that the power car of the Bachmann model
represents the bodyshell configuration associated with the power-twin sets (the brake
compartment window arrangement is different on the power car / trailer car sets). David�s
model was of the latter formation, but with a power-twin guards compartment layout.
Thus, basically to get a correct model I had to get a power car type underframe (with
the two engines etc.) for the trailer car if that makes sense? Mistakenly I bought a
power car underframe (logically one might think), which however was of course the metal
one with the cut-out for the motor bogie � wrong choice! The solution was to cut off
all the underframe mouldings and transfer to the existing trailer car vehicle. Got there in the end!
When I delved into the detail it was apparent that the power car of the Bachmann model
represents the bodyshell configuration associated with the power-twin sets (the brake
compartment window arrangement is different on the power car / trailer car sets). David�s
model was of the latter formation, but with a power-twin guards compartment layout.
Thus, basically to get a correct model I had to get a power car type underframe (with
the two engines etc.) for the trailer car if that makes sense? Mistakenly I bought a
power car underframe (logically one might think), which however was of course the metal
one with the cut-out for the motor bogie � wrong choice! The solution was to cut off
all the underframe mouldings and transfer to the existing trailer car vehicle. Got there in the end!
 So, I now had a correct power-twin formation for the body type depicted. Sadly, it was
numbered as an Eastern Region power car / trailer set, so the numbers had to be changed for
a suitable LMR power-twin combination, ordered from Railtec Transfers, who also did the
Kendal Castle destination labels as well. Anyway, the result is a bit different and a
contrast with the other set I have in original green with speed whiskers (fortunately
an LMR power-twin as well).
So, I now had a correct power-twin formation for the body type depicted. Sadly, it was
numbered as an Eastern Region power car / trailer set, so the numbers had to be changed for
a suitable LMR power-twin combination, ordered from Railtec Transfers, who also did the
Kendal Castle destination labels as well. Anyway, the result is a bit different and a
contrast with the other set I have in original green with speed whiskers (fortunately
an LMR power-twin as well).
![]()
 My serious interest in model railways started during the early 1980s when I was a member
of the Cheadle Hulme School Model Railway Society, exhibiting alongside Pete Johnson's
Canada Road and with other members of the society. It was only during the last few
years that I reunited with Pete via numerous emails, where he gave me guidance on
my models and weathering in particular.
My serious interest in model railways started during the early 1980s when I was a member
of the Cheadle Hulme School Model Railway Society, exhibiting alongside Pete Johnson's
Canada Road and with other members of the society. It was only during the last few
years that I reunited with Pete via numerous emails, where he gave me guidance on
my models and weathering in particular.
 Here are some of the wagons I made with Pete's guidance back and forth via email the
other year. I made about 20 in all using acrylic paint (mainly Tamiya) and isopropyl
alcohol as my thinner, whereas Pete used enamel and matt varnish for his. I managed
to get a similar look by referencing his images on this website.
Here are some of the wagons I made with Pete's guidance back and forth via email the
other year. I made about 20 in all using acrylic paint (mainly Tamiya) and isopropyl
alcohol as my thinner, whereas Pete used enamel and matt varnish for his. I managed
to get a similar look by referencing his images on this website.
 I would speed build and paint one in an evening and send Pete images the next day. He
would critique it and say I missed off a layer of dirt in a certain corner etc, so I
would tweek the weathering and send him a new pic. This went on for quite a few weeks
as I made many of them.
I would speed build and paint one in an evening and send Pete images the next day. He
would critique it and say I missed off a layer of dirt in a certain corner etc, so I
would tweek the weathering and send him a new pic. This went on for quite a few weeks
as I made many of them.
 The Airfix and Parkside wagons pictured here are in the process of being converted to
EM gauge, with the emgauge70s website being a huge go to resource for inspiration over the years.
The Airfix and Parkside wagons pictured here are in the process of being converted to
EM gauge, with the emgauge70s website being a huge go to resource for inspiration over the years.
 I've dug out the 1980 base board I had when I was at school, and made a new top using
12mm plywood attached to the original frame. It's something I discussed with him the
other year and I just need to do it. I think it will have a feel and style of Canada
Road / Canada Street. This is my homage to Pete Johnson.
I've dug out the 1980 base board I had when I was at school, and made a new top using
12mm plywood attached to the original frame. It's something I discussed with him the
other year and I just need to do it. I think it will have a feel and style of Canada
Road / Canada Street. This is my homage to Pete Johnson.
![]()
 This last month has seen the construction of a new cross-over, which allows stock to
easily access the main lines. Previously this would have involved running out
of the south sidings into the headshunt (nearest road), then having to propel back
out onto the main lines. The duration of the possesion dictated that the crossing vees
and most of the geometry was constructed in the first session, then a return to finish
off the point blades and operating linkages later. Simple slide switch operation using
guided high tensile steel wire with angle cranks under the baseboard.
This last month has seen the construction of a new cross-over, which allows stock to
easily access the main lines. Previously this would have involved running out
of the south sidings into the headshunt (nearest road), then having to propel back
out onto the main lines. The duration of the possesion dictated that the crossing vees
and most of the geometry was constructed in the first session, then a return to finish
off the point blades and operating linkages later. Simple slide switch operation using
guided high tensile steel wire with angle cranks under the baseboard.
 Brush type 4 number 1516 heads an Up Anglo-Scottish sleeper service on the last leg of its
journey to Kings Cross. With the recent introduction of the Heljan TCV car carriers,
it has allowed a prototypical rake to be formed, as would have been seen during daylight
hours. Most if not all Down sleeper services would have been under the cover of darkness
in the Metropolis.
Brush type 4 number 1516 heads an Up Anglo-Scottish sleeper service on the last leg of its
journey to Kings Cross. With the recent introduction of the Heljan TCV car carriers,
it has allowed a prototypical rake to be formed, as would have been seen during daylight
hours. Most if not all Down sleeper services would have been under the cover of darkness
in the Metropolis.
 The 3 Newton & Chambers TCV car carriers are seen here tagged on the rear. Work carried
out includes reprofiling the flanges and spreading the existing wheels out to EM gauge,
along with all-over weathering to represent the vehicles C1970, highlighting the prominent
vertical panel lines along their sides.
Various video clips from recent running sessions have been uploaded to Youtube. Please
click on the above image to view the latest videos.
The 3 Newton & Chambers TCV car carriers are seen here tagged on the rear. Work carried
out includes reprofiling the flanges and spreading the existing wheels out to EM gauge,
along with all-over weathering to represent the vehicles C1970, highlighting the prominent
vertical panel lines along their sides.
Various video clips from recent running sessions have been uploaded to Youtube. Please
click on the above image to view the latest videos.