*****************************************************************************************************************************************************************
JANUARY 2021 UPDATE
*****************************************************************************************************************************************************************
KARL CROWTHER
*****************************************************************************************************************************************************************
GREG BROOKES
*****************************************************************************************************************************************************************
PAUL JAMES
*****************************************************************************************************************************************************************
HYWEL THOMAS
*****************************************************************************************************************************************************************
PETE JOHNSON
*****************************************************************************************************************************************************************
KIER HARDY
Here's wishing everyone all the best for 2021. Thank you to all those who have contributed to
the emgauge70s website in one way or another. Your feedback as always is much appreciated.
Take care and stay safe.
*****************************************************************************************************************************************************************
![]()
 Firstly, a Happy New Year to one and all – let’s hope for better things in 2021! The festive
period has at long last seen the conclusion of wiring up the main fiddle yard area. In this
view, the main control panel is in the centre. This incorporates route selection switches
worked by a diode matrix. To the left and right of this are two smaller panels which are
arranged in ‘signal box’ fashion. On the left is Arnside East Junction box – which marks
the block line section leaving the fiddle yard in the Down direction. The slightly larger
panel to the right actually incorporates the signal boxes for both Natland and Heversham
Junctions (which in operational terms form two halves of the same signalling position).
The embryonic Natland Junction/Marthwaite Branch pointwork can be seen at the front of the photo.
Firstly, a Happy New Year to one and all – let’s hope for better things in 2021! The festive
period has at long last seen the conclusion of wiring up the main fiddle yard area. In this
view, the main control panel is in the centre. This incorporates route selection switches
worked by a diode matrix. To the left and right of this are two smaller panels which are
arranged in ‘signal box’ fashion. On the left is Arnside East Junction box – which marks
the block line section leaving the fiddle yard in the Down direction. The slightly larger
panel to the right actually incorporates the signal boxes for both Natland and Heversham
Junctions (which in operational terms form two halves of the same signalling position).
The embryonic Natland Junction/Marthwaite Branch pointwork can be seen at the front of the photo.
 This is the diode matrix box that works the main fiddle yard control panel, very kindly
designed and built for me by Richard Challis. The 25-way connector (bottom left) receives
the inputs from the switch panel and those in the centre and to the right, form the
connections to the layout. It’s been designed so that only routes actually selected have
track power fed to them. The bank of three relays you can see are to do with the switching
of a double slip formation.
This is the diode matrix box that works the main fiddle yard control panel, very kindly
designed and built for me by Richard Challis. The 25-way connector (bottom left) receives
the inputs from the switch panel and those in the centre and to the right, form the
connections to the layout. It’s been designed so that only routes actually selected have
track power fed to them. The bank of three relays you can see are to do with the switching
of a double slip formation.
 A view from the Heversham end of the fiddle yard area. The Heversham/Natland panel can be
seen front, left. To the left hand side of the boards is the pointwork for Natland Junction
and the Marthwaite Branch fiddle yard – one of the tasks I got completed over the Christmas
holiday. The triangular shaped gap to the front is intended to house a loco-length sector
plate for the three sidings marked out by the lengths of flexi-track.
A view from the Heversham end of the fiddle yard area. The Heversham/Natland panel can be
seen front, left. To the left hand side of the boards is the pointwork for Natland Junction
and the Marthwaite Branch fiddle yard – one of the tasks I got completed over the Christmas
holiday. The triangular shaped gap to the front is intended to house a loco-length sector
plate for the three sidings marked out by the lengths of flexi-track.
 This shows the other end of Natland Junction. Where the pointwork meets the bare board area
marks the point where the Kendal Castle scenic section will commence. If you follow back the
alignment of the double track from Natland Junction you can trace the route this will take
to link up with Heversham Junction in the distance.
This shows the other end of Natland Junction. Where the pointwork meets the bare board area
marks the point where the Kendal Castle scenic section will commence. If you follow back the
alignment of the double track from Natland Junction you can trace the route this will take
to link up with Heversham Junction in the distance.
 Another view across the Natland Junction pointwork. After the best part of three months
working on the wiring, it’s great to be able to run something round the main fiddle yard at
last! The next task is to get the remaining plain track laid in the Natland/Heversham/Martaite
area of the fiddle yard and wire it all up. In the meantime it’s back to Templot to make a
start on planning Kendal Castle…..
Another view across the Natland Junction pointwork. After the best part of three months
working on the wiring, it’s great to be able to run something round the main fiddle yard at
last! The next task is to get the remaining plain track laid in the Natland/Heversham/Martaite
area of the fiddle yard and wire it all up. In the meantime it’s back to Templot to make a
start on planning Kendal Castle…..
 Finally, a view along the length of the main fiddle yard, taken from the Arnside end. Arnside
East Junction is represented by the point marking the commencement of the double line section,
while the additional point just after this on the up line (left) will lead to the loco storage area.
Finally, a view along the length of the main fiddle yard, taken from the Arnside end. Arnside
East Junction is represented by the point marking the commencement of the double line section,
while the additional point just after this on the up line (left) will lead to the loco storage area.
![]()
 The Shenston Road Baby Deltics are being treated to a slightly enlarged headcode box, as
the Heljan dimensions are somewhat a bit too small and difficult to fit 4mm scale digits.
The surround shape has been created by Jonny Duffett on his silhouette cutting machine. The
discrepancy is highlighted more on the full yellow panel version, whereas the small yellow
panel green version (pictured unmodified) it isn't as noticable, but will be next on the list to do.
The Shenston Road Baby Deltics are being treated to a slightly enlarged headcode box, as
the Heljan dimensions are somewhat a bit too small and difficult to fit 4mm scale digits.
The surround shape has been created by Jonny Duffett on his silhouette cutting machine. The
discrepancy is highlighted more on the full yellow panel version, whereas the small yellow
panel green version (pictured unmodified) it isn't as noticable, but will be next on the list to do.
 A brief period in early December 2020 found The Marches area of the country in tier 1, which gave
us the opportunity to have a social / running session at Hornsey Broadway. These next few images show
some of the visiting Shenston Road loco's in action. Here's D1057 Western Chieftain on a mixed freight.
A brief period in early December 2020 found The Marches area of the country in tier 1, which gave
us the opportunity to have a social / running session at Hornsey Broadway. These next few images show
some of the visiting Shenston Road loco's in action. Here's D1057 Western Chieftain on a mixed freight.
 Recently out of the detailing stage is another SLW Class 24 (5096) on test and awaiting light
weathering. Numbers and works plates have been altered / attached in the correct positions.
Recently out of the detailing stage is another SLW Class 24 (5096) on test and awaiting light
weathering. Numbers and works plates have been altered / attached in the correct positions.
 Class 40 number D236 is put to work on a long rake of loaded 16 ton mineral wagons.
![]()
 The last few weeks have been devoted to making the garage more habitable, with the walls
and ceiling being insulated, plasterboarded and painted. The shelves have been better
organised making the railway room a much more pleasant place to be.
The last few weeks have been devoted to making the garage more habitable, with the walls
and ceiling being insulated, plasterboarded and painted. The shelves have been better
organised making the railway room a much more pleasant place to be.
 Showing the layout in place after cladding and painting the garage. With this reorganisation
completed, work can now continue on the layout and the scenery. LED strip lighting has been
fitted to the ceiling for the full length of the garage, as well as LED illumination above the
layout. For reference I've used these
Showing the layout in place after cladding and painting the garage. With this reorganisation
completed, work can now continue on the layout and the scenery. LED strip lighting has been
fitted to the ceiling for the full length of the garage, as well as LED illumination above the
layout. For reference I've used these
![]()
 With plenty of other distractions this month, not to mention the ongoing pandemic, I decided
to venture back in time and dig out two old Airfix Esso tank wagon kits (each with a 50p price
sticker on them!). For a kit designed in 1960 they are still excellent models and with only a
small amount of work can be upgraded nicely. Here we see the first changes - filling in the
various holes ahead of an RT Models upgrade etch.
With plenty of other distractions this month, not to mention the ongoing pandemic, I decided
to venture back in time and dig out two old Airfix Esso tank wagon kits (each with a 50p price
sticker on them!). For a kit designed in 1960 they are still excellent models and with only a
small amount of work can be upgraded nicely. Here we see the first changes - filling in the
various holes ahead of an RT Models upgrade etch.
 The holes were filled with plastic and then filler before sanding smooth. Inside a simple
plastic box was fabricated that was filled with ‘Liquid Lead’ all held in place with dilute
PVA to add some much needed weight.
The holes were filled with plastic and then filler before sanding smooth. Inside a simple
plastic box was fabricated that was filled with ‘Liquid Lead’ all held in place with dilute
PVA to add some much needed weight.
 Now we see the two tanks with the first of the RT etches fixed in place - the walkway supports
and the tank lid support. Sanding has also been done on the join in the barrels. The next task
to tackle were the two chassis. Overall these are still very good mouldings but one issue is
the depth of the solebar that is too narrow (oddly enough on the much later, and much pricier,
Heljan RTR examples the solebar is too deep!).
Now we see the two tanks with the first of the RT etches fixed in place - the walkway supports
and the tank lid support. Sanding has also been done on the join in the barrels. The next task
to tackle were the two chassis. Overall these are still very good mouldings but one issue is
the depth of the solebar that is too narrow (oddly enough on the much later, and much pricier,
Heljan RTR examples the solebar is too deep!).
 Here are the modified pair of chassis. They were modified in the same way that I’d altered the
HO tanks converted to ferry examples. The top lip was removed and a new top lip built up with
plastic strip. The area above was also was tidied up at the same time. I also found that the
solebars benefitted from being moved out slightly using a strip of 30-thou strip each side. A
discharge pipe was also added and new buffers.
Here are the modified pair of chassis. They were modified in the same way that I’d altered the
HO tanks converted to ferry examples. The top lip was removed and a new top lip built up with
plastic strip. The area above was also was tidied up at the same time. I also found that the
solebars benefitted from being moved out slightly using a strip of 30-thou strip each side. A
discharge pipe was also added and new buffers.
 With the tank ends fitted, the next job was to fit the tanks to the chassis. The pair were going
to become former Esso now Lion Emulsions tanks and these had slightly different strengthening
plates around the tank fixings so these were added from 10-thou sheet. The walkways and hand
wheel were from the RT etch. I originally used their ladder etches but even after soldering
wires along each side rail I still found they were very flimsy. As my wagons do get handled a
lot I decided to use the kit ladders but much trimmed and thinned.
With the tank ends fitted, the next job was to fit the tanks to the chassis. The pair were going
to become former Esso now Lion Emulsions tanks and these had slightly different strengthening
plates around the tank fixings so these were added from 10-thou sheet. The walkways and hand
wheel were from the RT etch. I originally used their ladder etches but even after soldering
wires along each side rail I still found they were very flimsy. As my wagons do get handled a
lot I decided to use the kit ladders but much trimmed and thinned.
 After a blast of primer you can get a better idea of the added depth to the solebar and the
blending of that into the top of the frame. The RT walkway etch works really well and is a
very worthwhile upgrade to the chunky plastic original.
After a blast of primer you can get a better idea of the added depth to the solebar and the
blending of that into the top of the frame. The RT walkway etch works really well and is a
very worthwhile upgrade to the chunky plastic original.
 I used a spray can for the black topcoat, which did give the smooth finish I wanted as these
tanks had only just been bought from Esso in 1972 and so were still very fresh.
I used a spray can for the black topcoat, which did give the smooth finish I wanted as these
tanks had only just been bought from Esso in 1972 and so were still very fresh.
 The two are almost finished but I need to get hold of some satin varnish for the barrels as
soon as the latest restrictions end. For a relatively simple livery there are a lot of transfers
on these wagons! In fact there were 36 individual pieces on each tank, a mix of Airfix originals,
HMRS Pressfix, Modelmaster and Fox. L22 sports a home-produced Retread Roads cast plate while
L10 has the Lion Emulsions version, both based on the original fitments.
The two are almost finished but I need to get hold of some satin varnish for the barrels as
soon as the latest restrictions end. For a relatively simple livery there are a lot of transfers
on these wagons! In fact there were 36 individual pieces on each tank, a mix of Airfix originals,
HMRS Pressfix, Modelmaster and Fox. L22 sports a home-produced Retread Roads cast plate while
L10 has the Lion Emulsions version, both based on the original fitments.
![]()
 The 16 ton mineral wagons have been completed after having the third and fourth weathering
stages applied. Stage three is painting a grime mix onto the underframe and lower third of
the body panels. The paint on the bodysides is then cut back with a clean brush and white
spirit to leave traces which blend out gradually from the lower edge and framing crevices.
The 16 ton mineral wagons have been completed after having the third and fourth weathering
stages applied. Stage three is painting a grime mix onto the underframe and lower third of
the body panels. The paint on the bodysides is then cut back with a clean brush and white
spirit to leave traces which blend out gradually from the lower edge and framing crevices.
 The fourth and final stage is to overpaint the larger rust patches with Revell 84 straight from
the tin, or mixed slightly with matt yellows and oranges, to suggest fresher rusting in some areas.
The fourth and final stage is to overpaint the larger rust patches with Revell 84 straight from
the tin, or mixed slightly with matt yellows and oranges, to suggest fresher rusting in some areas.
 On the last pair a yellow datapanel sticker has also been added, as if applied relatively recently.
These were a livery feature of the 1970s which often peeled quickly from the dirty or rusted
surfaces where they were sometimes applied.
On the last pair a yellow datapanel sticker has also been added, as if applied relatively recently.
These were a livery feature of the 1970s which often peeled quickly from the dirty or rusted
surfaces where they were sometimes applied.
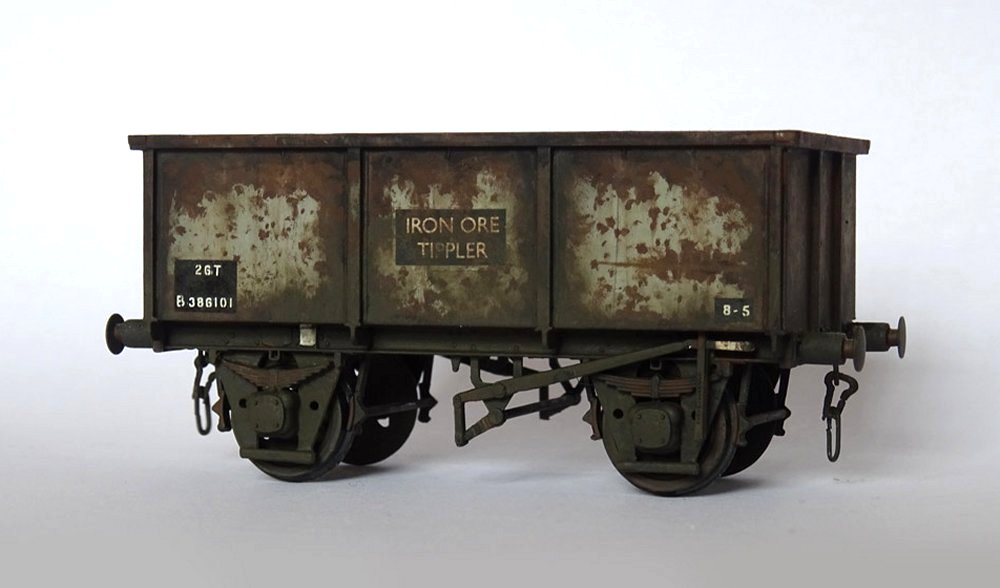 The 26T Ore Tippler has had the same finishing stages applied, and markings added as if recently
re-painted on top of the originals. This livery is based on a Paul Bartlett photograph of B386101.
The 26T Ore Tippler has had the same finishing stages applied, and markings added as if recently
re-painted on top of the originals. This livery is based on a Paul Bartlett photograph of B386101.
 The Flatrol MVV, numbered as B900000, has also been finished to a well weathered appearance.
 2021 is starting with a series of re-shelling projects. These include my pair of scratchbuilt
Adams B4 0-4-0 dock tanks dating back to the early 1980s. My best efforts lack the crisp detail
of the Dapol mouldings, so a chance to get a couple of spare shells was taken. These will be
finished as a pair of Eastleigh locos that remained in service into 1963. ‘30096’ is one of
the Dapol identities, but has had minor improvements to the smokebox door hinges and number plate.
2021 is starting with a series of re-shelling projects. These include my pair of scratchbuilt
Adams B4 0-4-0 dock tanks dating back to the early 1980s. My best efforts lack the crisp detail
of the Dapol mouldings, so a chance to get a couple of spare shells was taken. These will be
finished as a pair of Eastleigh locos that remained in service into 1963. ‘30096’ is one of
the Dapol identities, but has had minor improvements to the smokebox door hinges and number plate.
 The second of the pair is being finished as ‘30102’. This loco featured a cab front with 3
round windows, and has had minor work on the smokebox door. Steam heat pipes have also been
added under the bufferbeams.
The second of the pair is being finished as ‘30102’. This loco featured a cab front with 3
round windows, and has had minor work on the smokebox door. Steam heat pipes have also been
added under the bufferbeams.
 The cabs of these aged locos were originally far more open, and the way in which they were
panelled-in varied considerably between examples. 1960s photos of 30096 show the cab side
plate to be smaller than the Dapol version, so this has been trimmed on the model.
The cabs of these aged locos were originally far more open, and the way in which they were
panelled-in varied considerably between examples. 1960s photos of 30096 show the cab side
plate to be smaller than the Dapol version, so this has been trimmed on the model.
 In contrast this panel on 30102 matched the Dapol rendering, but the cab back lacked the
handbrake winding blister, which has been removed. The pair are shown ready for weathering.
In contrast this panel on 30102 matched the Dapol rendering, but the cab back lacked the
handbrake winding blister, which has been removed. The pair are shown ready for weathering.
 Four ViTrains Class 47 shells are also being readied to replace my old Hornby re-works. One
of these is shown after stripping using Phoenix Superstrip ready for a respray into Rail Blue.
Four ViTrains Class 47 shells are also being readied to replace my old Hornby re-works. One
of these is shown after stripping using Phoenix Superstrip ready for a respray into Rail Blue.
 The Hudswell Clarke 0-6-0 has now had the livery applied as ‘D2502’, as it appeared in 1966-67.
Final weathering is still required to see it finished. Research suggests that only three of
the class received wasp stripes, and that these three all retained the original black livery
right through to the scrapyard.
The Hudswell Clarke 0-6-0 has now had the livery applied as ‘D2502’, as it appeared in 1966-67.
Final weathering is still required to see it finished. Research suggests that only three of
the class received wasp stripes, and that these three all retained the original black livery
right through to the scrapyard.
![]()
 Continuing with the station project, the platform tops can be seen at various stages of scribing
and decoration. The contrast of the colours is stark to begin with, so that subsequent washes and
weathering should result in subtle tone variations, representing the slight differences between
mixes and oxydisation. The right hand image shows the platform tops after an intial toning wash
and ready for fitting. The centre tarmac sections will require filling and blending at the joints
to match each other.
Continuing with the station project, the platform tops can be seen at various stages of scribing
and decoration. The contrast of the colours is stark to begin with, so that subsequent washes and
weathering should result in subtle tone variations, representing the slight differences between
mixes and oxydisation. The right hand image shows the platform tops after an intial toning wash
and ready for fitting. The centre tarmac sections will require filling and blending at the joints
to match each other.
 With the platform walls in place, the ballasting was carefully brushed into place, mist wetted, and
then soaked with diluted PVA from a eye dropper. The nearest platform construction will be completed
after the Underground module has been incorporated into the scene.
With the platform walls in place, the ballasting was carefully brushed into place, mist wetted, and
then soaked with diluted PVA from a eye dropper. The nearest platform construction will be completed
after the Underground module has been incorporated into the scene.
 The track has been given some initial weathering treatment with the air brush prior to fitting the
platform tops. Internal support walls have been added, with the off-cuts being used to brace the
areas where the joints will be. The platform tops are secured using a 2-part epoxy resin applied
to the ends, and a bead applied to the tops of all the walls.
The track has been given some initial weathering treatment with the air brush prior to fitting the
platform tops. Internal support walls have been added, with the off-cuts being used to brace the
areas where the joints will be. The platform tops are secured using a 2-part epoxy resin applied
to the ends, and a bead applied to the tops of all the walls.
 Although the remainder of the platforms beyond the bridge are mostly out of view, it became apparent
when looking through under the bridge that the scenic section came to an abrupt end. The platform
construction has been continued in silhouette form using black plastic with a brushed finished. In
addition to the four main line controlled circuits, occasional independant Up Slow, and Branch
control is available using the 2 switches - their very occasional use doesn't warrant them being moved.
Although the remainder of the platforms beyond the bridge are mostly out of view, it became apparent
when looking through under the bridge that the scenic section came to an abrupt end. The platform
construction has been continued in silhouette form using black plastic with a brushed finished. In
addition to the four main line controlled circuits, occasional independant Up Slow, and Branch
control is available using the 2 switches - their very occasional use doesn't warrant them being moved.
 This view shows how much a part of the scene they play, albeit off-scene. Additional 'detail in
the dark' features such as steps down to the platforms will highlight what is beyond the bridge parapet.
This view shows how much a part of the scene they play, albeit off-scene. Additional 'detail in
the dark' features such as steps down to the platforms will highlight what is beyond the bridge parapet.
 The station area showing progress so far, captured on the last day of 2020. Attention can now be
focused on some of the smaller details such as canopies, signals, platform lamps and lineside
cabling.
The station area showing progress so far, captured on the last day of 2020. Attention can now be
focused on some of the smaller details such as canopies, signals, platform lamps and lineside
cabling.