*****************************************************************************************************************************************************************
JULY 2020 UPDATE
*****************************************************************************************************************************************************************
PETE JOHNSON
*****************************************************************************************************************************************************************
GREG BROOKES
*****************************************************************************************************************************************************************
KIER HARDY
*****************************************************************************************************************************************************************
PAUL JAMES
*****************************************************************************************************************************************************************
KARL CROWTHER
*****************************************************************************************************************************************************************
HYWEL THOMAS
![]()
 Some more wagon kit builds have got on the bench during C.19 isolation. A mix of Airfix kits
bought about 39 years ago (!), and more recent Parkside salvage projects have resulted in
these seven Dia 1/108 standard 16 tonners. Livery and weathering to suit the mid-1960s/70s
era will be applied.
Some more wagon kit builds have got on the bench during C.19 isolation. A mix of Airfix kits
bought about 39 years ago (!), and more recent Parkside salvage projects have resulted in
these seven Dia 1/108 standard 16 tonners. Livery and weathering to suit the mid-1960s/70s
era will be applied.
 Two even more ancient kits have also been put together, to add to the early 1960s wagon stock
on the layout. The wooden-bodied coke wagon is from a Ratio kit and has been given an ex-private
owner ‘P’ number as is perhaps a bit freelance in detail. The LNER wood frame fish van is from
an early Ian Kirk kit, complete with whitemetal underframe. It has been modified into the BR
re-work of the type, which continued in use through to the mid-1960s. PECO/Parkside now offer
a kit of this design, but I couldn’t resist the challenge of converting the old Kirk product….
Two even more ancient kits have also been put together, to add to the early 1960s wagon stock
on the layout. The wooden-bodied coke wagon is from a Ratio kit and has been given an ex-private
owner ‘P’ number as is perhaps a bit freelance in detail. The LNER wood frame fish van is from
an early Ian Kirk kit, complete with whitemetal underframe. It has been modified into the BR
re-work of the type, which continued in use through to the mid-1960s. PECO/Parkside now offer
a kit of this design, but I couldn’t resist the challenge of converting the old Kirk product….
![]()
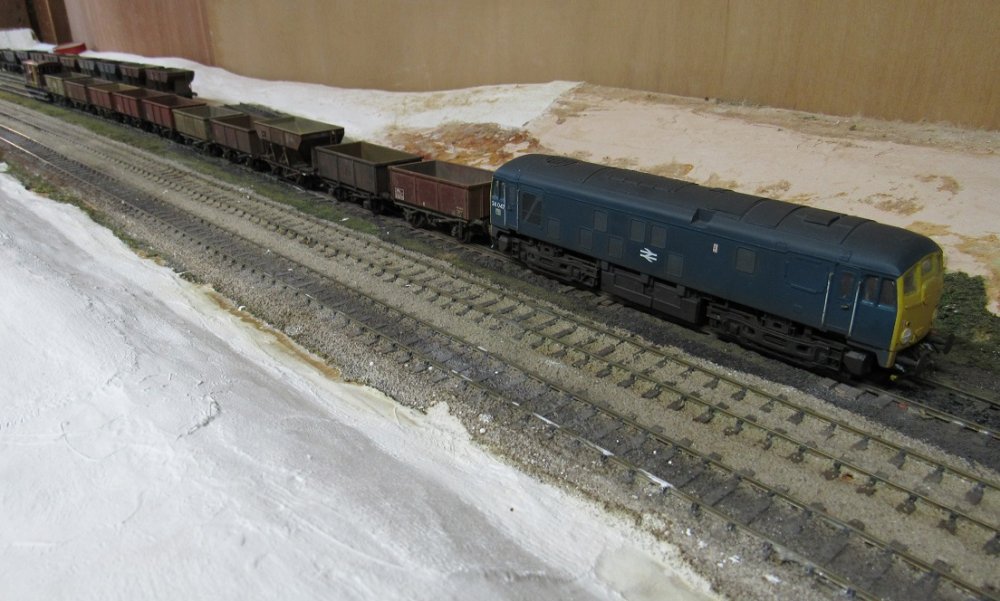
 Recent additions to the fleet include this pair of BR Derby Sulzer type 2 loco's, Class
25/0 conversions from the Bachmann Class 24 model, numbers 5155 & 5151.
Recent additions to the fleet include this pair of BR Derby Sulzer type 2 loco's, Class
25/0 conversions from the Bachmann Class 24 model, numbers 5155 & 5151.
 The most obvious detail difference between the later Class 24s and the early Class 25s
is the absence of the underslung boiler water tank.
The most obvious detail difference between the later Class 24s and the early Class 25s
is the absence of the underslung boiler water tank.
 D1039 Western King is a Dapol model, enhanced with the addition of a few bodyside scrapes.
 5140 is a D05 Stoke Division allocated locomotive, seen here hauling 21 ton mineral wagons.
 Another Bachmann Class 24, converted to EM gauge with customised weathering from a photograph.
![]()
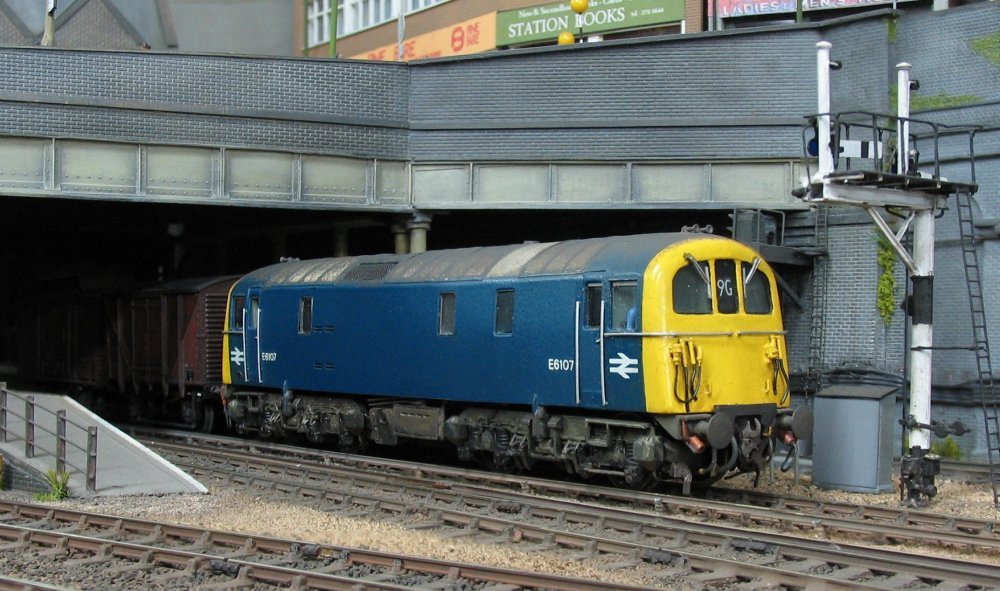 Electro-diesel E6107 is held at the signals at the head of a inter-regional freight. This
model of a Class 74 has been constructed using a Silver Fox resin body and a heavily modified
Hornby Class 71 chassis and cabs.
Electro-diesel E6107 is held at the signals at the head of a inter-regional freight. This
model of a Class 74 has been constructed using a Silver Fox resin body and a heavily modified
Hornby Class 71 chassis and cabs.
 The majority of the conversion work was completed at the end of last year, and it had been
stuck in the works whilst a decision was made regarding the fine mesh grills on the side and roof.
There's a slight blemish on the bodyside behind the driver's position, but it's something I
can live with for now rather than potentially making it worse.
The majority of the conversion work was completed at the end of last year, and it had been
stuck in the works whilst a decision was made regarding the fine mesh grills on the side and roof.
There's a slight blemish on the bodyside behind the driver's position, but it's something I
can live with for now rather than potentially making it worse.
 The grills were cut from a sheet of fine nickel silver mesh from the Barchetta automotive
modelling range using scissors. Once each grill had been test fitted, a mix of neat PVA glue
(with a touch of black acrylic paint added) was applied to the edges of the bodyside apertures
and left for a few minutes to go off. The grills were then fitted, with water applied by a small
brush around the edges to seal the mesh to the body by capiliary action. Also in the works for
attention is D3312 which had lost the D prefix to its number, and long term resident D3989 which
now just requires some weathering to its newly applied green livery.
The grills were cut from a sheet of fine nickel silver mesh from the Barchetta automotive
modelling range using scissors. Once each grill had been test fitted, a mix of neat PVA glue
(with a touch of black acrylic paint added) was applied to the edges of the bodyside apertures
and left for a few minutes to go off. The grills were then fitted, with water applied by a small
brush around the edges to seal the mesh to the body by capiliary action. Also in the works for
attention is D3312 which had lost the D prefix to its number, and long term resident D3989 which
now just requires some weathering to its newly applied green livery.
 This Bachmann Class 08 was originally a dirty blue TOPS numbered example last seen in use at
Wibdenshaw. It's filthy condition didn't quite fit into the Hornsey scene, so it now represents
a FP allocated green machine with rusty deposits, copied from a photograph of it in 1970.
This Bachmann Class 08 was originally a dirty blue TOPS numbered example last seen in use at
Wibdenshaw. It's filthy condition didn't quite fit into the Hornsey scene, so it now represents
a FP allocated green machine with rusty deposits, copied from a photograph of it in 1970.
 This now brings the Hornsey Class 08 fleet up to 4 working examples as shown here. Nearest the
camera is D3036 with D3989, and blue 3332 (all Bachmann), with green D3312 (Hornby) tucked away
at the back. There are also 2 further green unpowered Bachmann Class 08s (D3918 & D4040 with rods
removed) for use within a trip freight working.
This now brings the Hornsey Class 08 fleet up to 4 working examples as shown here. Nearest the
camera is D3036 with D3989, and blue 3332 (all Bachmann), with green D3312 (Hornby) tucked away
at the back. There are also 2 further green unpowered Bachmann Class 08s (D3918 & D4040 with rods
removed) for use within a trip freight working.
A 7 minute YouTube clip of the recently completed Class 74 and Class 501 at Hornsey Broadway.
![]()
 A test fit of the pointwork. The lone point on the left was supposed to fit just beyond the
double slip, but the geometry didn't work out so another point had to be designed to fit.
The unused point was placed in the position in the photo to see if an additional loop on the
industrial line would be possible, but this idea was later dropped and the point used in the
upper sidings.
A test fit of the pointwork. The lone point on the left was supposed to fit just beyond the
double slip, but the geometry didn't work out so another point had to be designed to fit.
The unused point was placed in the position in the photo to see if an additional loop on the
industrial line would be possible, but this idea was later dropped and the point used in the
upper sidings.
 The point designed to fit by the double slip, as explained in the previous photo.
It was designed using old EM Gauge society templates with a 1:10 crossing added to a B7 LH
switch, to get the right geometry. Having run out of the correct timber sleepers, this point
was built using copper clad sleepers.
The point designed to fit by the double slip, as explained in the previous photo.
It was designed using old EM Gauge society templates with a 1:10 crossing added to a B7 LH
switch, to get the right geometry. Having run out of the correct timber sleepers, this point
was built using copper clad sleepers.
 The initial design only had a storage yard length capable of holding a small loco, 10 wagons
+ brake van, as seen here. The storage yard design is still evolving, and I eventually hope
that the train length can be increased to 16 wagons.
The initial design only had a storage yard length capable of holding a small loco, 10 wagons
+ brake van, as seen here. The storage yard design is still evolving, and I eventually hope
that the train length can be increased to 16 wagons.
 Before being laid in position, the pointwork had some additional detail added in the form of
cosmetic point tie bars, courtesy of Ambis Engineering. They were then sprayed with a coat of
Halfords red oxide primer, followed by a coat of sleeper grime as seen here. Once glued down
in position, they will receive additional weathering along with the rest of the track.
Before being laid in position, the pointwork had some additional detail added in the form of
cosmetic point tie bars, courtesy of Ambis Engineering. They were then sprayed with a coat of
Halfords red oxide primer, followed by a coat of sleeper grime as seen here. Once glued down
in position, they will receive additional weathering along with the rest of the track.
 Track laying completed with some test stock in use to check for defects. The high level
sidings and pointwork was first to be laid in position, followed by the dead end low level
sidings. The position of the low level sidings dictated the position of the
pointwork at the far end of the layout, so it was important to get them down first.
Track laying completed with some test stock in use to check for defects. The high level
sidings and pointwork was first to be laid in position, followed by the dead end low level
sidings. The position of the low level sidings dictated the position of the
pointwork at the far end of the layout, so it was important to get them down first.
 The pointwork glued in place and being tested using the unpowered class 24 visible in the
distance. The line disappearing off bottom left is the industrial line, the final position of
this was only decided upon once the pointwork was in place. Now it has been glued in position,
the scenic work can now be started, to hide it heading off scene.
The pointwork glued in place and being tested using the unpowered class 24 visible in the
distance. The line disappearing off bottom left is the industrial line, the final position of
this was only decided upon once the pointwork was in place. Now it has been glued in position,
the scenic work can now be started, to hide it heading off scene.
 Here's the track plan for Wood End Sidings. At the moment apart from the halt at the bottom
right of the plan, the position of the buildings that are going to appear on the layout have
not been decided on. The single track branch runs bottom left to right, with the very basic
Wood End Halt at the RH end. The halt will be only capable of holding a 3 car DMU at a push,
and will be very basic and very much akin to those I remember on the Central Wales Line. One
that really represents what I want to capture is in this link to a
Here's the track plan for Wood End Sidings. At the moment apart from the halt at the bottom
right of the plan, the position of the buildings that are going to appear on the layout have
not been decided on. The single track branch runs bottom left to right, with the very basic
Wood End Halt at the RH end. The halt will be only capable of holding a 3 car DMU at a push,
and will be very basic and very much akin to those I remember on the Central Wales Line. One
that really represents what I want to capture is in this link to a ![]()
 This first view encapsulates much of what I’ve been up to this month. The pointwork and
indeed much of the associated track at Kentside station has been completed and work is
now underway to get the point servos installed. The down line here (in front of the 4F)
is a section of flat bottom track with BR1 baseplates. The cue for this is the fact that
part of the Arnside-Hincaster branch latterly had FB track. I’m also gradually working
through the ex-Kentside locos and rolling stock to get them ready for the new layout,
this 4F being the latest through the works, seen here on initial testing after the upgrade.
This first view encapsulates much of what I’ve been up to this month. The pointwork and
indeed much of the associated track at Kentside station has been completed and work is
now underway to get the point servos installed. The down line here (in front of the 4F)
is a section of flat bottom track with BR1 baseplates. The cue for this is the fact that
part of the Arnside-Hincaster branch latterly had FB track. I’m also gradually working
through the ex-Kentside locos and rolling stock to get them ready for the new layout,
this 4F being the latest through the works, seen here on initial testing after the upgrade.
 The FB track was built using Colin Craig’s etches. As each chairplate has to first be
assembled, it obviously takes a lot longer to build than BH track, but the contrast of
the two types makes that bit of extra effort worthwhile (though I only had five 60-foot
panels to do!). There are two parts to each chairplate, the outer, main part (upper in
photo) and the bit that gets sandwiched inside, with the 3 ‘prongs’ that represent the
elastic spikes (very fragile). The long strip with half-edged centre is a jig provided
for bending the spikes to shape once the chairplate has been soldered. Below are some
completed chairplates.
The FB track was built using Colin Craig’s etches. As each chairplate has to first be
assembled, it obviously takes a lot longer to build than BH track, but the contrast of
the two types makes that bit of extra effort worthwhile (though I only had five 60-foot
panels to do!). There are two parts to each chairplate, the outer, main part (upper in
photo) and the bit that gets sandwiched inside, with the 3 ‘prongs’ that represent the
elastic spikes (very fragile). The long strip with half-edged centre is a jig provided
for bending the spikes to shape once the chairplate has been soldered. Below are some
completed chairplates.
 I used this jig to assemble ‘half track’ units of the FB track. You need to first pre-tin
the underside of the rail and can then either use an RSU or a big (e.g. 40W) iron, holding
this on the top of the rail. A blob of flux and around a 1mm length of 145 degree solder
placed beside the chairplate and it flashes through to make the join. The resulting track
is very rigid, though the elastic spikes I suspect may be vulnerable, only time will tell.
Once laid and after gapping the copperclad sleepers with a grinding disc in the mini-drill,
Milliput filler was then applied to restore the sleeper surface.
I used this jig to assemble ‘half track’ units of the FB track. You need to first pre-tin
the underside of the rail and can then either use an RSU or a big (e.g. 40W) iron, holding
this on the top of the rail. A blob of flux and around a 1mm length of 145 degree solder
placed beside the chairplate and it flashes through to make the join. The resulting track
is very rigid, though the elastic spikes I suspect may be vulnerable, only time will tell.
Once laid and after gapping the copperclad sleepers with a grinding disc in the mini-drill,
Milliput filler was then applied to restore the sleeper surface.
 Quite a lot has happened here since last month. Firstly, the FB track just mentioned now
makes a complete circuit on the down line (though this still needs to be fully wired up).
Above and to the right of the 4F can be seen all of the points now installed for the
Kentside goods yard sidings. Reading from the left are: end loading dock/departure siding,
goods shed road (with the coaches stood on it), to the right of that, the coal siding and
the timber road, plus finally (next to the 4F), the point leading to the cattle dock. The
headshunt extending across the lifting section is also now in place as well as the down
‘refuge’ siding. The odd triangular ‘upstand’ (right of photo) is a temporary feature for
the lifting section to rest against when raised - eventually this will clip to the backscene
as there will be a bridge abutment at this location (roughly where the 4F is).
Quite a lot has happened here since last month. Firstly, the FB track just mentioned now
makes a complete circuit on the down line (though this still needs to be fully wired up).
Above and to the right of the 4F can be seen all of the points now installed for the
Kentside goods yard sidings. Reading from the left are: end loading dock/departure siding,
goods shed road (with the coaches stood on it), to the right of that, the coal siding and
the timber road, plus finally (next to the 4F), the point leading to the cattle dock. The
headshunt extending across the lifting section is also now in place as well as the down
‘refuge’ siding. The odd triangular ‘upstand’ (right of photo) is a temporary feature for
the lifting section to rest against when raised - eventually this will clip to the backscene
as there will be a bridge abutment at this location (roughly where the 4F is).
 Work in progress with the wiring showing how the point servos have here been fitted along
the baseboard edge. Connections to the point tie bars are via wire in tube (from Wizard
Models), routed inside the cork ballast layer (need to remember to cut the channels before
laying any track on top!). In between the two servos are a MERG Servo 4 drive board and
its relay circuit board (which both activate the servos and change the crossing polarity).
All this will eventually be hidden beneath a removable section of scenery.
Work in progress with the wiring showing how the point servos have here been fitted along
the baseboard edge. Connections to the point tie bars are via wire in tube (from Wizard
Models), routed inside the cork ballast layer (need to remember to cut the channels before
laying any track on top!). In between the two servos are a MERG Servo 4 drive board and
its relay circuit board (which both activate the servos and change the crossing polarity).
All this will eventually be hidden beneath a removable section of scenery.
 The original Kentside MK1 4F used an Airfix body on a Perseverance chassis. After some 34
shows the mechanism was getting quite worn, so the opportunity was taken to upgrade the
chassis with new hornblocks and a motor/gearbox from High Level. Luckily I was able to
retain the Ultrascale wheels, though I did convert to ‘live axle one side’ pickup between
loco & tender using EMGS wheel shorting frets. The main issue with the body is the
overscale splashers and these have been replaced with Brassmasters offerings. Also I
added the missing lower section of the boiler and the various lamp irons etc. (after
this photo had been taken). I was keen to retain as much of the character as possible
of the original model and so the new additions were ‘patch painted’ and blended in to
the existing finish as well as I could manage, which seems to have worked quite well if
you refer back to the first photo. All that remains after running-in on Analog, is to
re-fit the sandboxes and the crew figures and then think about sorting the DCC.
The original Kentside MK1 4F used an Airfix body on a Perseverance chassis. After some 34
shows the mechanism was getting quite worn, so the opportunity was taken to upgrade the
chassis with new hornblocks and a motor/gearbox from High Level. Luckily I was able to
retain the Ultrascale wheels, though I did convert to ‘live axle one side’ pickup between
loco & tender using EMGS wheel shorting frets. The main issue with the body is the
overscale splashers and these have been replaced with Brassmasters offerings. Also I
added the missing lower section of the boiler and the various lamp irons etc. (after
this photo had been taken). I was keen to retain as much of the character as possible
of the original model and so the new additions were ‘patch painted’ and blended in to
the existing finish as well as I could manage, which seems to have worked quite well if
you refer back to the first photo. All that remains after running-in on Analog, is to
re-fit the sandboxes and the crew figures and then think about sorting the DCC.
![]()
 The one-time newsagent from Morfa Bank 1 is destined to become a Welsh-Italian café. As
it’s not close to the front of the board I decided to create a card kit for the interior
as it wouldn’t need too much detail. So the ‘kit’ comprised the interior, complete with
pictures, menu and the like plus exterior signage. Here we see the back wall and floor
assembled on a thick card base.
The one-time newsagent from Morfa Bank 1 is destined to become a Welsh-Italian café. As
it’s not close to the front of the board I decided to create a card kit for the interior
as it wouldn’t need too much detail. So the ‘kit’ comprised the interior, complete with
pictures, menu and the like plus exterior signage. Here we see the back wall and floor
assembled on a thick card base.
 Here’s the finished basic structure. It’s designed to sit up under the former corner shop
behind. It will have some lighting too so that’s been designed in for the future. The menu,
clock and specials boards were all screen grabs from actual cafe images off the web and
assembled on the computer.
Here’s the finished basic structure. It’s designed to sit up under the former corner shop
behind. It will have some lighting too so that’s been designed in for the future. The menu,
clock and specials boards were all screen grabs from actual cafe images off the web and
assembled on the computer.
 A rather cruel close-up showing the interior test-fitted inside. The frame was soon to be
painted to match the new very 1970s colours of the signage.
A rather cruel close-up showing the interior test-fitted inside. The frame was soon to be
painted to match the new very 1970s colours of the signage.
 Next up was a few typical café additions - the grinder, the flashy Italian coffee machine, a
1970s till and a few plates of hearty café fare. All were made from plastic offcuts, strip and rod.
Next up was a few typical café additions - the grinder, the flashy Italian coffee machine, a
1970s till and a few plates of hearty café fare. All were made from plastic offcuts, strip and rod.
 Still to be painted we see the scratch built chairs, the first of the three tables and two
ModelU passengers soon to get a window seat view of the maintenance canal at Morfa Bank!
Four more ModelU figures will provide the rest of the clientele and the owner.
Still to be painted we see the scratch built chairs, the first of the three tables and two
ModelU passengers soon to get a window seat view of the maintenance canal at Morfa Bank!
Four more ModelU figures will provide the rest of the clientele and the owner.
 This is where the cafe will sit. The canal wharf is in the foreground and the yard headhunt
is on the bank to the right. A future update will hopefully show the end result!
This is where the cafe will sit. The canal wharf is in the foreground and the yard headhunt
is on the bank to the right. A future update will hopefully show the end result!
 Next was a pipe gantry to run along the side of the main board where the headshunt runs
through the backscene. The main gas pipeline is polystyrene tube, while the top pipe is
Knightwing and the one in the foreground is Auhagen. The inspection platform is part of
a Zvezda kit for a German WW2 anti-tank gun! Continuing the military theme the front part
of the gantry support was an Airfix RAF Queen Mary trailer.
Next was a pipe gantry to run along the side of the main board where the headshunt runs
through the backscene. The main gas pipeline is polystyrene tube, while the top pipe is
Knightwing and the one in the foreground is Auhagen. The inspection platform is part of
a Zvezda kit for a German WW2 anti-tank gun! Continuing the military theme the front part
of the gantry support was an Airfix RAF Queen Mary trailer.
 Now painted the gantry is in place, disguising the exit for the headhunt and the foreground
fuel unloading siding for the foundry. Once I get around to painting the backscene this area
will be complete. The scenery has been continued past the gap in the backscene to give the
impression of something continuing in the distance.
Now painted the gantry is in place, disguising the exit for the headhunt and the foreground
fuel unloading siding for the foundry. Once I get around to painting the backscene this area
will be complete. The scenery has been continued past the gap in the backscene to give the
impression of something continuing in the distance.